Homework Assignment #0 — Dev Setup
No Late Days: There are no late days for this assignment: we want you to be on track for starting HW1, which is due soon after! You must complete this assignment individually, but may use or consult any resources you like.
EECS 481 is different from other EECS courses. It has a larger focus on software process, reading code, and using large systems to accomplish tasks. You will be expected to develop and maintain programs and scripts in multiple languages using multiple tools. As a result, we want to help you prepare a suitable development environment for the assignments in this course. To ensure that all of the students can run all of the programs (including older "legacy" programs) for this course, we use a unified cloud computing setup. HW0 will guide you in setting that up.
This assignment will help you create a development environment that can run all of the course assignments and broadly matches the autograder's setup. If you are not familiar with Linux command line tools, this assignment is a great place to start.
The assignments in this course have been designed around an x86_64 Ubuntu 24.04 LTS environment. All of the assignments are known to work in this environment. Officially, you must use this environment. (If you do not, then you will likely run into issues that are not covered in the homework specifications and that the course staff will not be able to help you with. That is, later commands will not work for you and you will be unable to complete the homeworks.) Different versions of tools and libraries are installed by default in different versions of Linux. As a result, if you deviate from the required x86_64 Ubuntu 24.04 environment, you may encounter corner cases that cause test cases to fail on the autograder. Ultimately, it is your responsibility to read documentation and install supported tools. This HW0 spec is meant to help you walk through the creation of a compliant x86_64 Ubuntu 24.04 environment.
Free Cloud Computing Setup with EC2 (Required)
For this course, you must set up a free Amazon EC2 cloud instance running Ubuntu 24.04. This will serve as your working environment for all assignments. Experience with Linux will help you but is not required.
While some students may have experience using local virtual machines (e.g., VirtualBox) or similar approaches (e.g., Docker or WSL), these alternatives are not supported for this course. Using the EC2 cloud setup ensures consistency and compatibility with the tools we will be using.
Amazon EC2 offers a reliable way to run Ubuntu 24.04 in the cloud — that is, on a remote machine that you can access but do not own. The instructions below will guide you to use Amazon's Free Tier, a cloud computing service that does not cost any money. (Do not mistakenly select any option that could cost you money.)
Start Early: Amazon can take up to 24 hours to verify and activate cloud computing accounts.
Details Matter: Your EC2 instance must run the exact Ubuntu 24.04 x86_64 version associated with this course. Other versions (e.g., ARM builds or newer Ubuntu versions) are not compatible with course tools and will not be supported. The instructions below will guide you through selecting exactly the right version for this course.
Background
First, read the summary of virtual machines and cloud computing below. Even if you are already familiar with the concepts, this course may use slightly different terminology, and I recommend that you skim this material.
Background — Virtual Machines and Cloud Computing
A Virtual Machine is an emulation of a computer system. Loosely, you can think of a VM as a program that can run an entire virtual computer system. Virtual machines are powerful software systems that enable running software designed for one operating system inside another operating system.
For example, you can use your Windows host computer to run a Virtual Machine that contains a Linux operating system. Consider the image below:

This is a Windows 10 host computer running three different Virtual Machine guests. The guest instances are complete (virtual) environments that are isolated from the host. All of the guests share the host's hardware as they execute — each window in the screenshot above lets you interact with a separate emulated guest.
Thus, even though the host is a Windows computer, you can use one of the guests to execute Linux software inside the guest. Virtual Machines can be used in many combinations. You can have a Windows, Linux, or Mac host computer, and run arbitary numbers and combinations of Linux and Windows guests. Finally, guests are stored as files in the host computer — this means you can move your VM guest from one host to another by transferring that file around.
Virtual machines are a critical part of Cloud computing. You can "rent out" computing resources from a provider like Amazon EC2 or Microsoft Azure to do whatever computation you might need. Amazon EC2 and Microsoft Azure both offer you virtual machine guests that run on their hardware. Thus, you can get access to a virtual machine running whatever operating system you like to run a variety of software.
Amazon EC2 "Elastic Cloud Compute" is a service that lets you buy and configure virtual machines. You will be setting and launching an Ubuntu 24.04 cloud instance for this course (this is free if you are a student).
Linux Fundamentals
Many of the assignments are easier to complete on Linux or similar command-line systems. EECS 481 professor Kevin Leach has prepared a (long) video that provides a gentle introduction to a number of Linux concepts. This video is optional, but you may find it useful if you are less familiar with the Linux environment.
There are timestamps in a comment below the video that contains points of interest, such as:
- terminals
- environment variables
- scripts in the shell
- compiling programs from source
- using ssh
The first half is more about terminals and shells (why do we have to type ./a.out? why can't we just say a.out?), and the second half is more about compiling programs from source. The video also covers elinks in particular, which is a terminal-based browser program.
Cloud Computing Setup — Amazon EC2
Start Early: Amazon AWS accounts can take up to 24 hours to verify, which means you may have to wait before you can continue to Step 3. Please start early!
You will need a Secure Shell (SSH) client. You should already be
familiar with SSH from using CAEN servers remotely. SSH allows you to
remotely interact with a server. When you SSH to a remote computer,
you have access to a command prompt that runs software on that
computer. We will be using SSH to interact with a virtual machine we create in the cloud with Amazon EC2.
On Windows, I recommend using WSL to run
SSH. You can also use PuTTY. On
Mac, you should already have ssh installed. Open a
terminal and you can run ssh. On Linux, you
can use ssh, but you may need to install it first (e.g.,
sudo apt-get install openssh or similar, depending on your
platform). It is your responsibility to understand how to use SSH,
but we give some pointers below.
Amazon EC2 is a cloud computing service that allows you to rent virtual machines that you can ssh to and run programs like any other computer. Amazon offers a large number of cloud-based services all under the umbrella of AWS (Amazon Web Services). EC2 is a subset of AWS. In this assignment, you will create an AWS account to manage a free EC2 virtual machine.
You can sign up for a new account on Amazon EC2, and in doing so, you get 12 months of free access to a virtual machine that is enough to complete the assignments in this course. If you do not already have an Amazon EC2 account, navigate to https://aws.amazon.com/ec2/ and click "Create new account" in the upper right.
To help you get started, EECS 481 Professor Priscila Santiesteban has prepared a short walkthrough video that shows how to sign up for AWS and configure your first EC2 instance. You must complete this setup before continuing with the assignment. The video is optional but highly recommended if you’re new to making an EC2 instance or want a visual guide to the EC2 setup process.
In most cases, Amazon EC2 only offers free access within the first 12 months of an account. If you already have an older account (e.g., for another class) you may need to create a new, second account (via a second email address) to get more free access.
Complete the sign up process. You will be prompted to enter credit card information during AWS account setup. You will not be charged as long as you stay within the AWS Free Tier limits. This includes using only eligible instance types (such as t3.micro), running them for up to 750 hours per month (note 24 hours/day * 31 days = 750, so you cannot exceed this limit unless you mistakenly run multiple instances) , and using up to 30 GB of EBS ("Elastic Block Store", Amazon's name for cloud computing disk space) general purpose (gp2) storage. If you launch multiple instances, use larger instance types, or exceed the storage limit, you may incur charges. It is your responsibility to monitor your usage through the AWS Console to avoid unexpected costs. (Over the last four times the professor has taught the course, zero students have complained about being mistakenly charged. We mention the monetary aspect not to scare students — if you follow the instructions on this assignment it will be free — but because the University is officially not liable.)
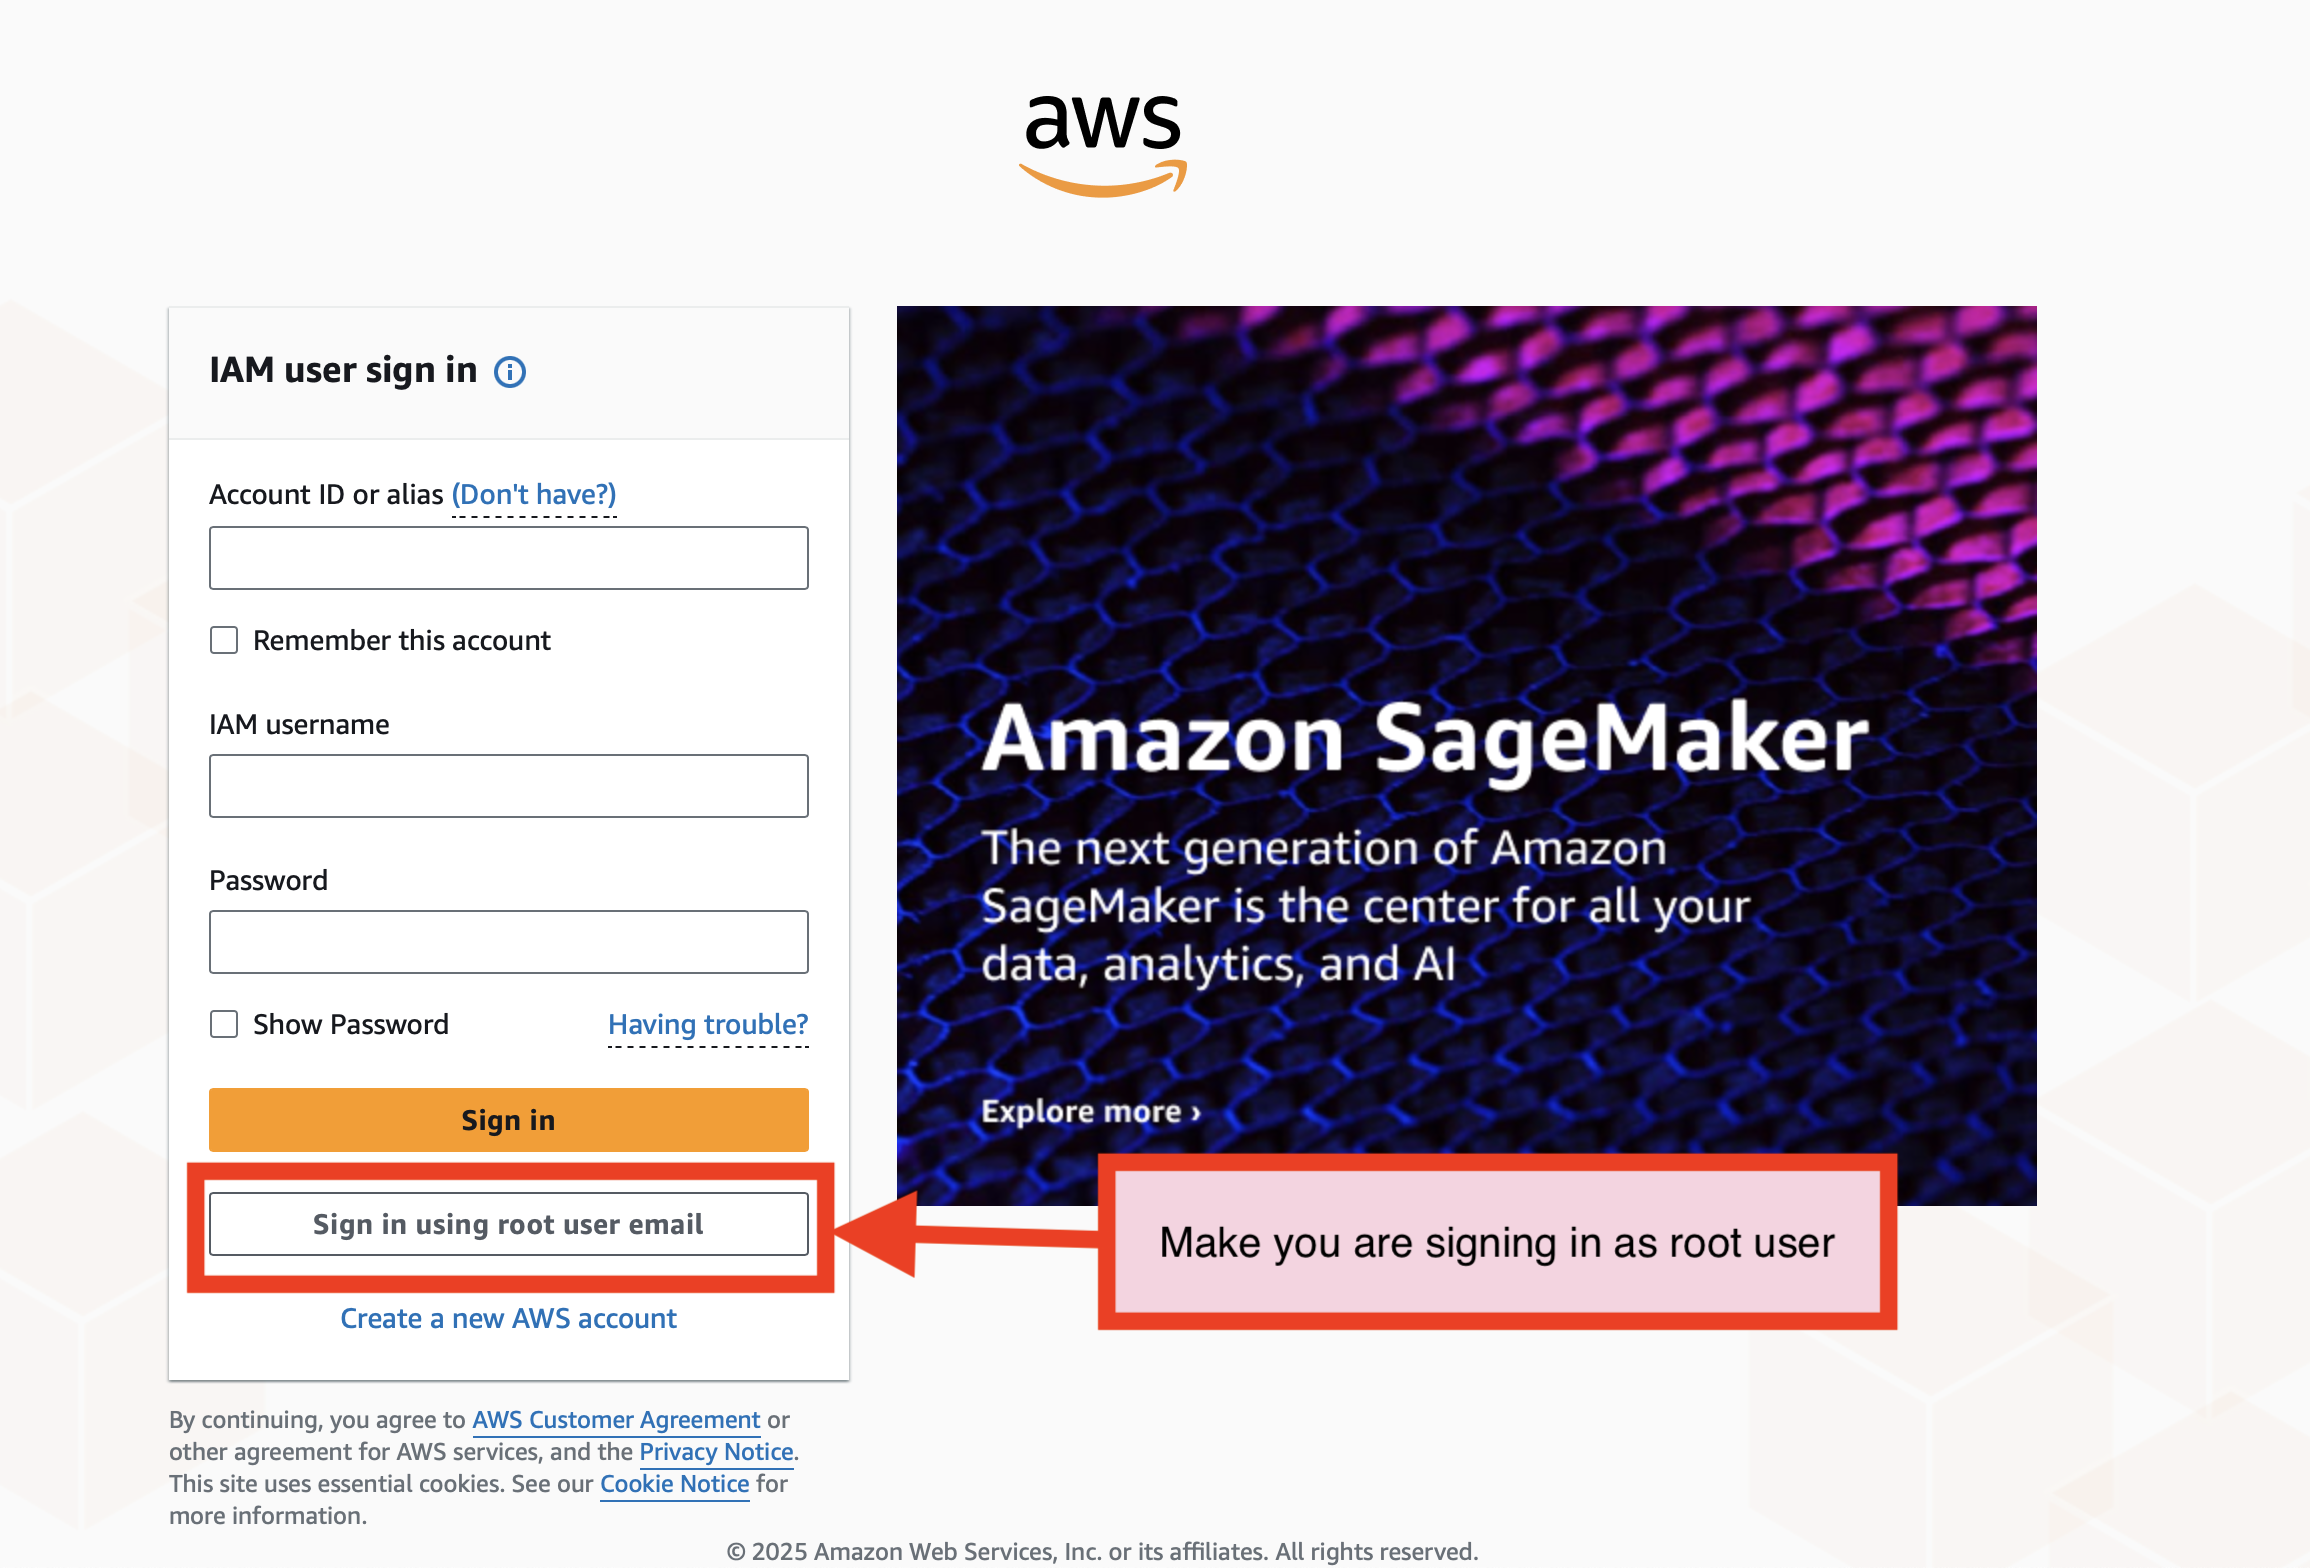
After setup, you will have access to the Amazon AWS Console to launch and manage your virtual machine. If you are prompted, you want to sign in as a "Root" user for the AWS console.
AWS Account Creation
Notice: AWS Web GUI Changes
Some of the screenshots in this guide are from older versions of the AWS Web Interface. The GUI changes fairly frequently and so your view may look a little different from the screenshots. Everything is fine and it's good practice to follow along with documentation that is not an exact match. The course staff verified that the instructions work and pass the HW0 autograder in 2026.
Creating a New VM
Now that you have created an account, you can use the AWS Console to help manage and launch virtual machine instances. We will walk you through the steps to create an Ubuntu 24.04 VM below.
(1) Open the AWS Console
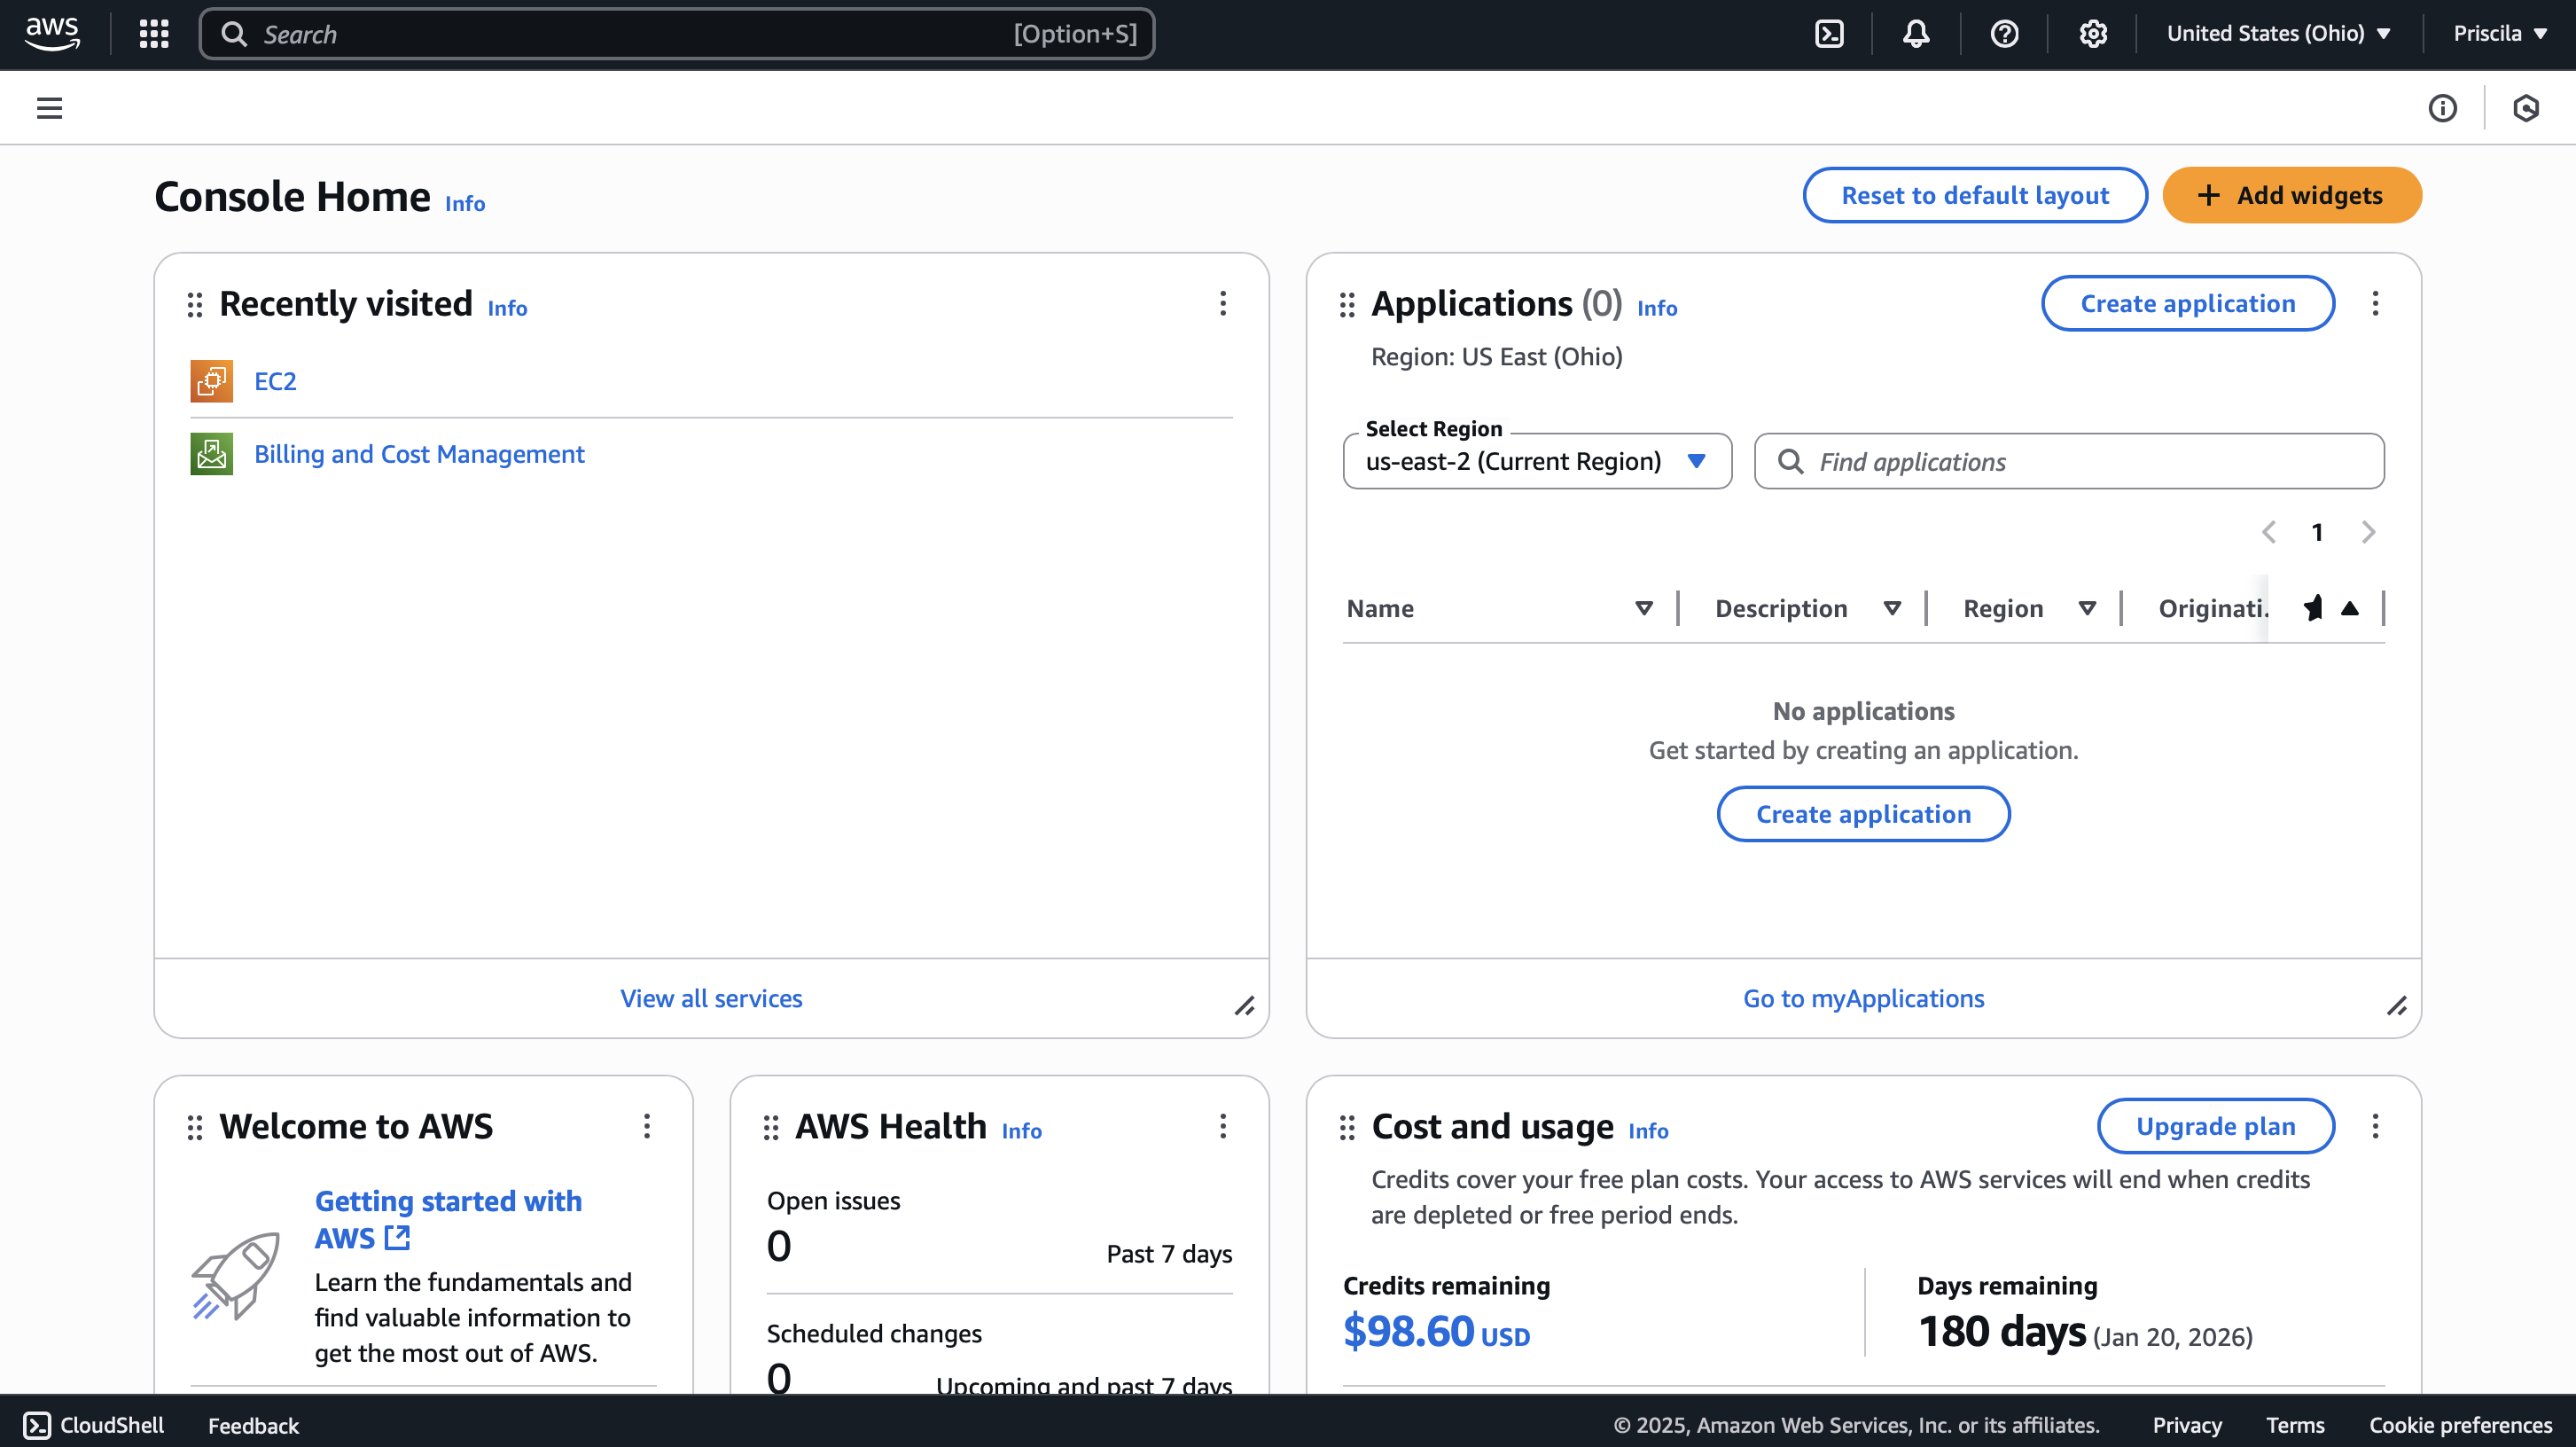
After you create an AWS account, you can visit the AWS Console at https://console.aws.amazon.com. At the console, you should be greeted with a large screen full of many services.
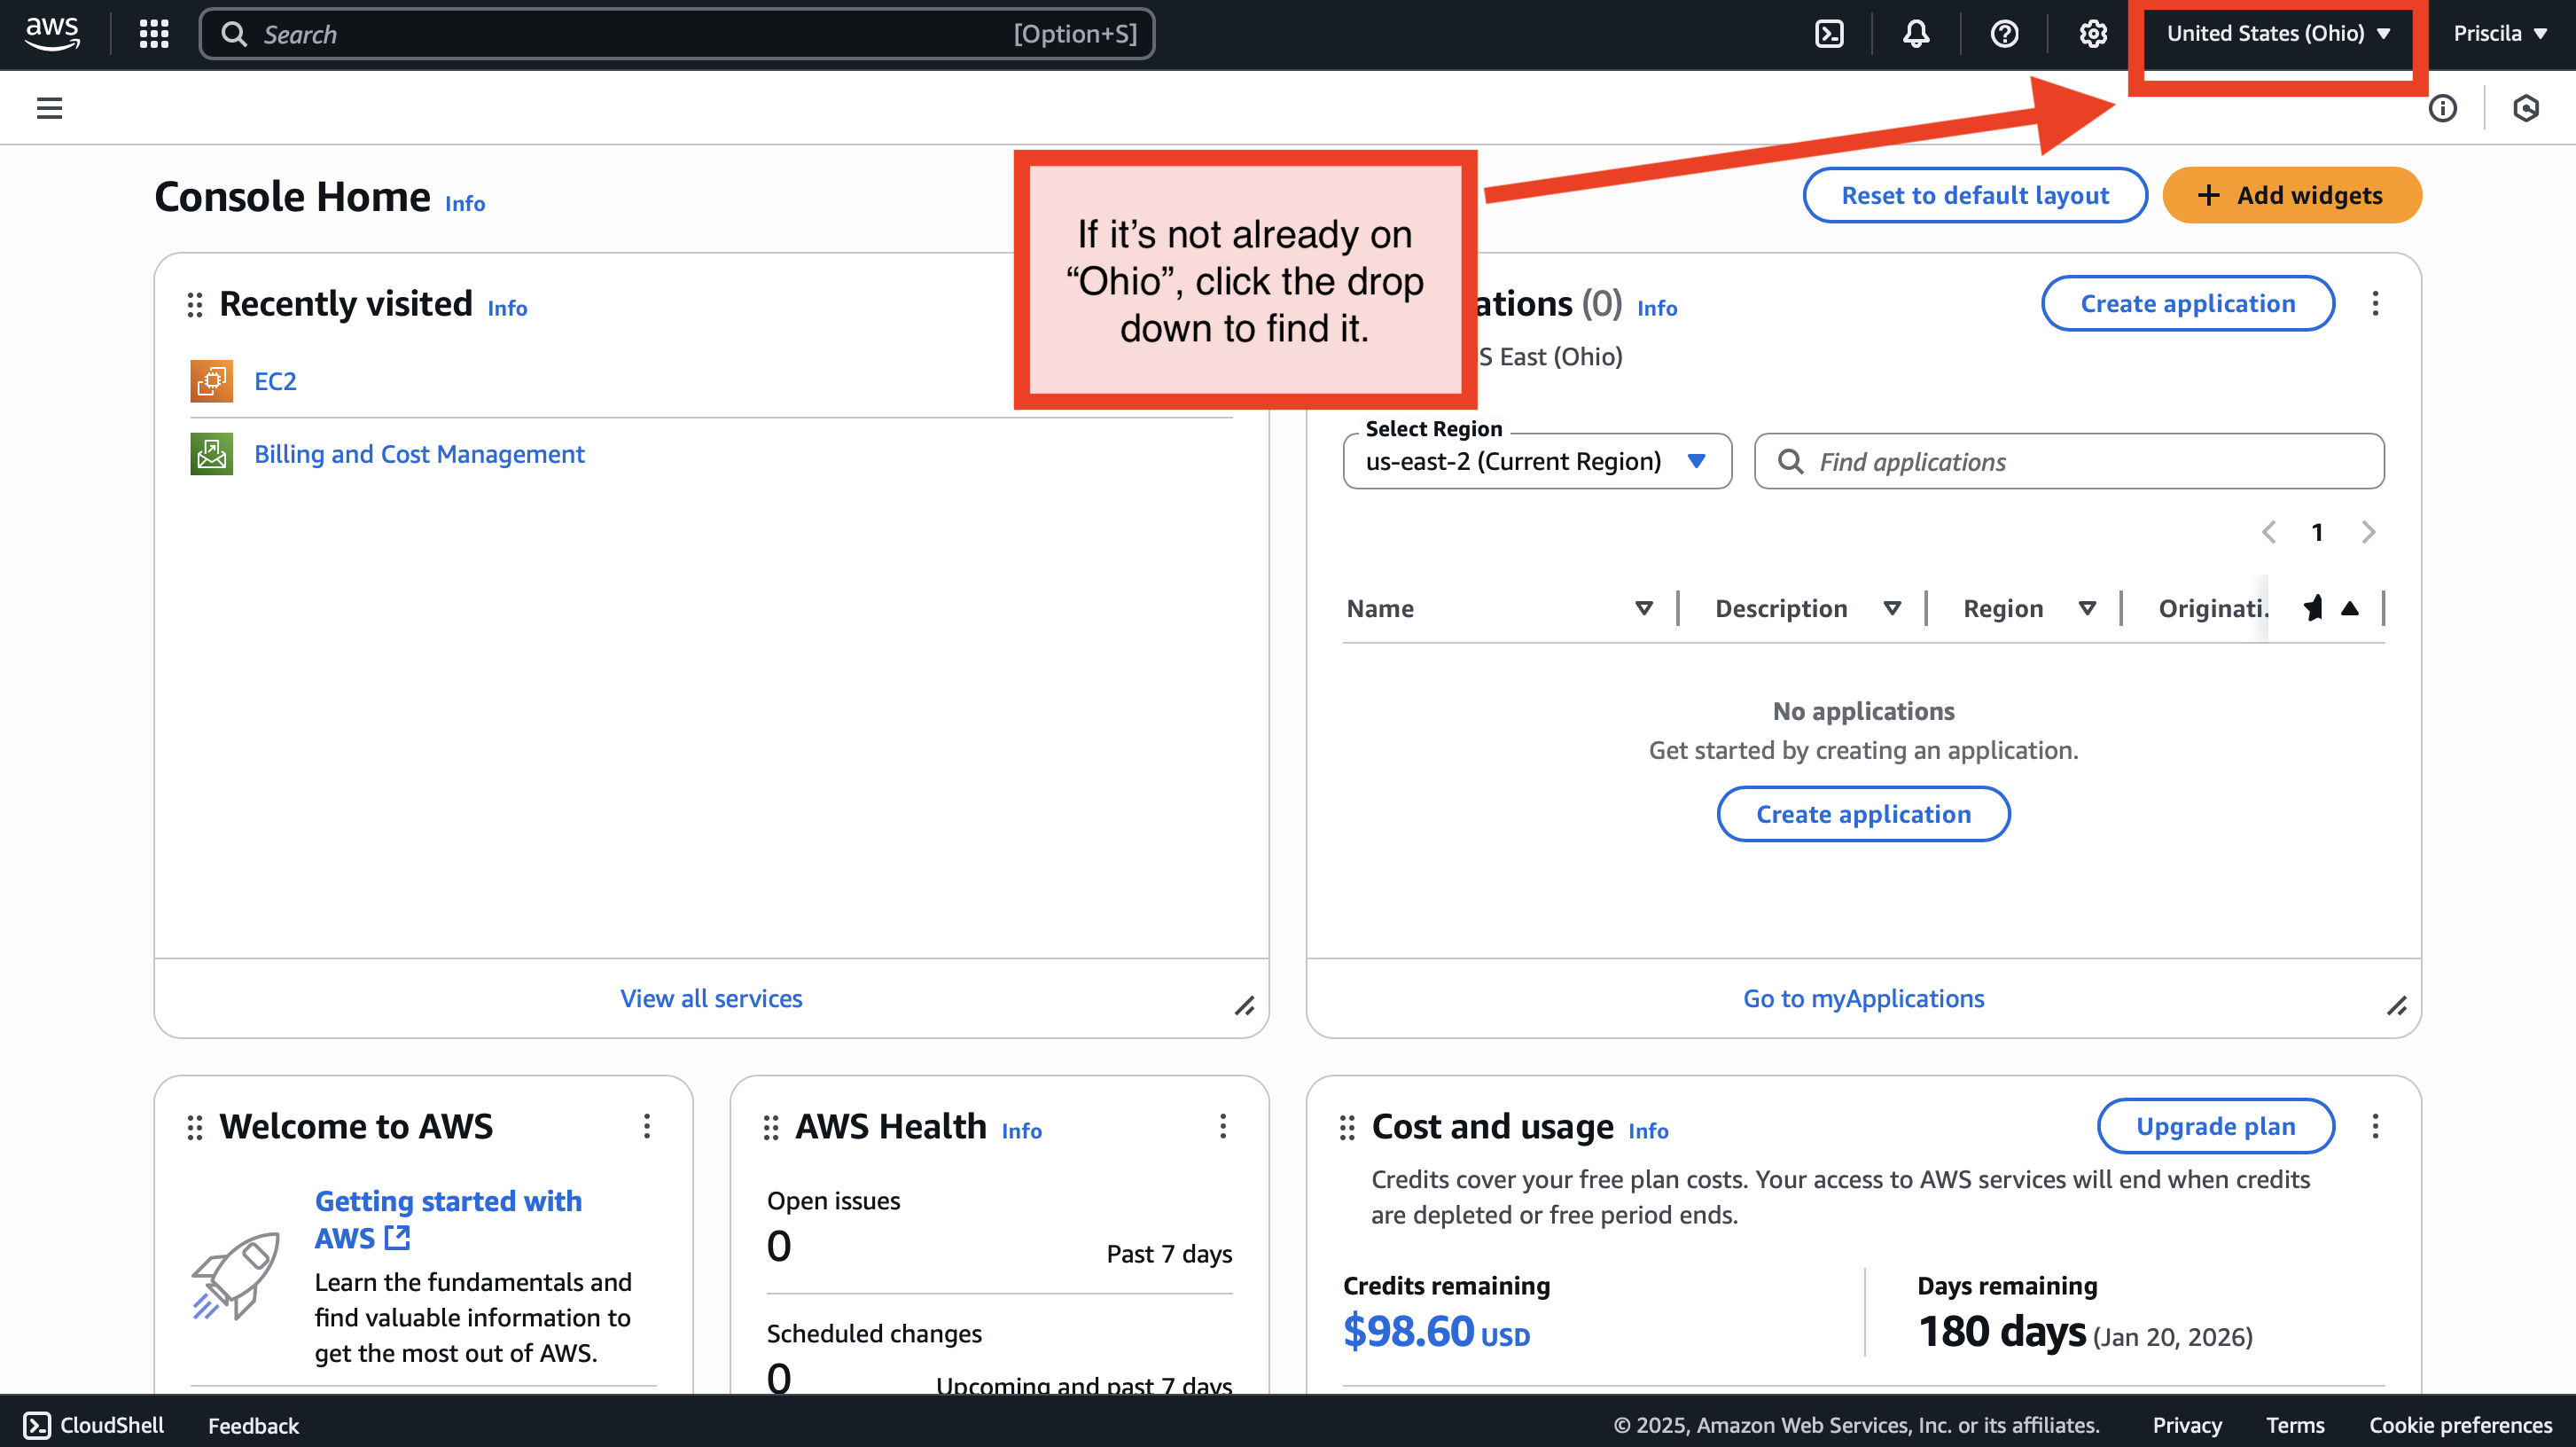
(2) Verify Your Region
Before launching your instance, make sure you are in the correct AWS region. Look in the top-right corner of the AWS Console for the current region (for example, US East (Ohio) us-east-2). We recommend using us-east-2 unless you have a specific reason to choose another region.
(3) Open the EC2 Manager to Launch an Instance
From the AWS Console, click the EC2 link to open the Elastic Cloud Compute manager.
If you don't see it, you may need to click "View all services".
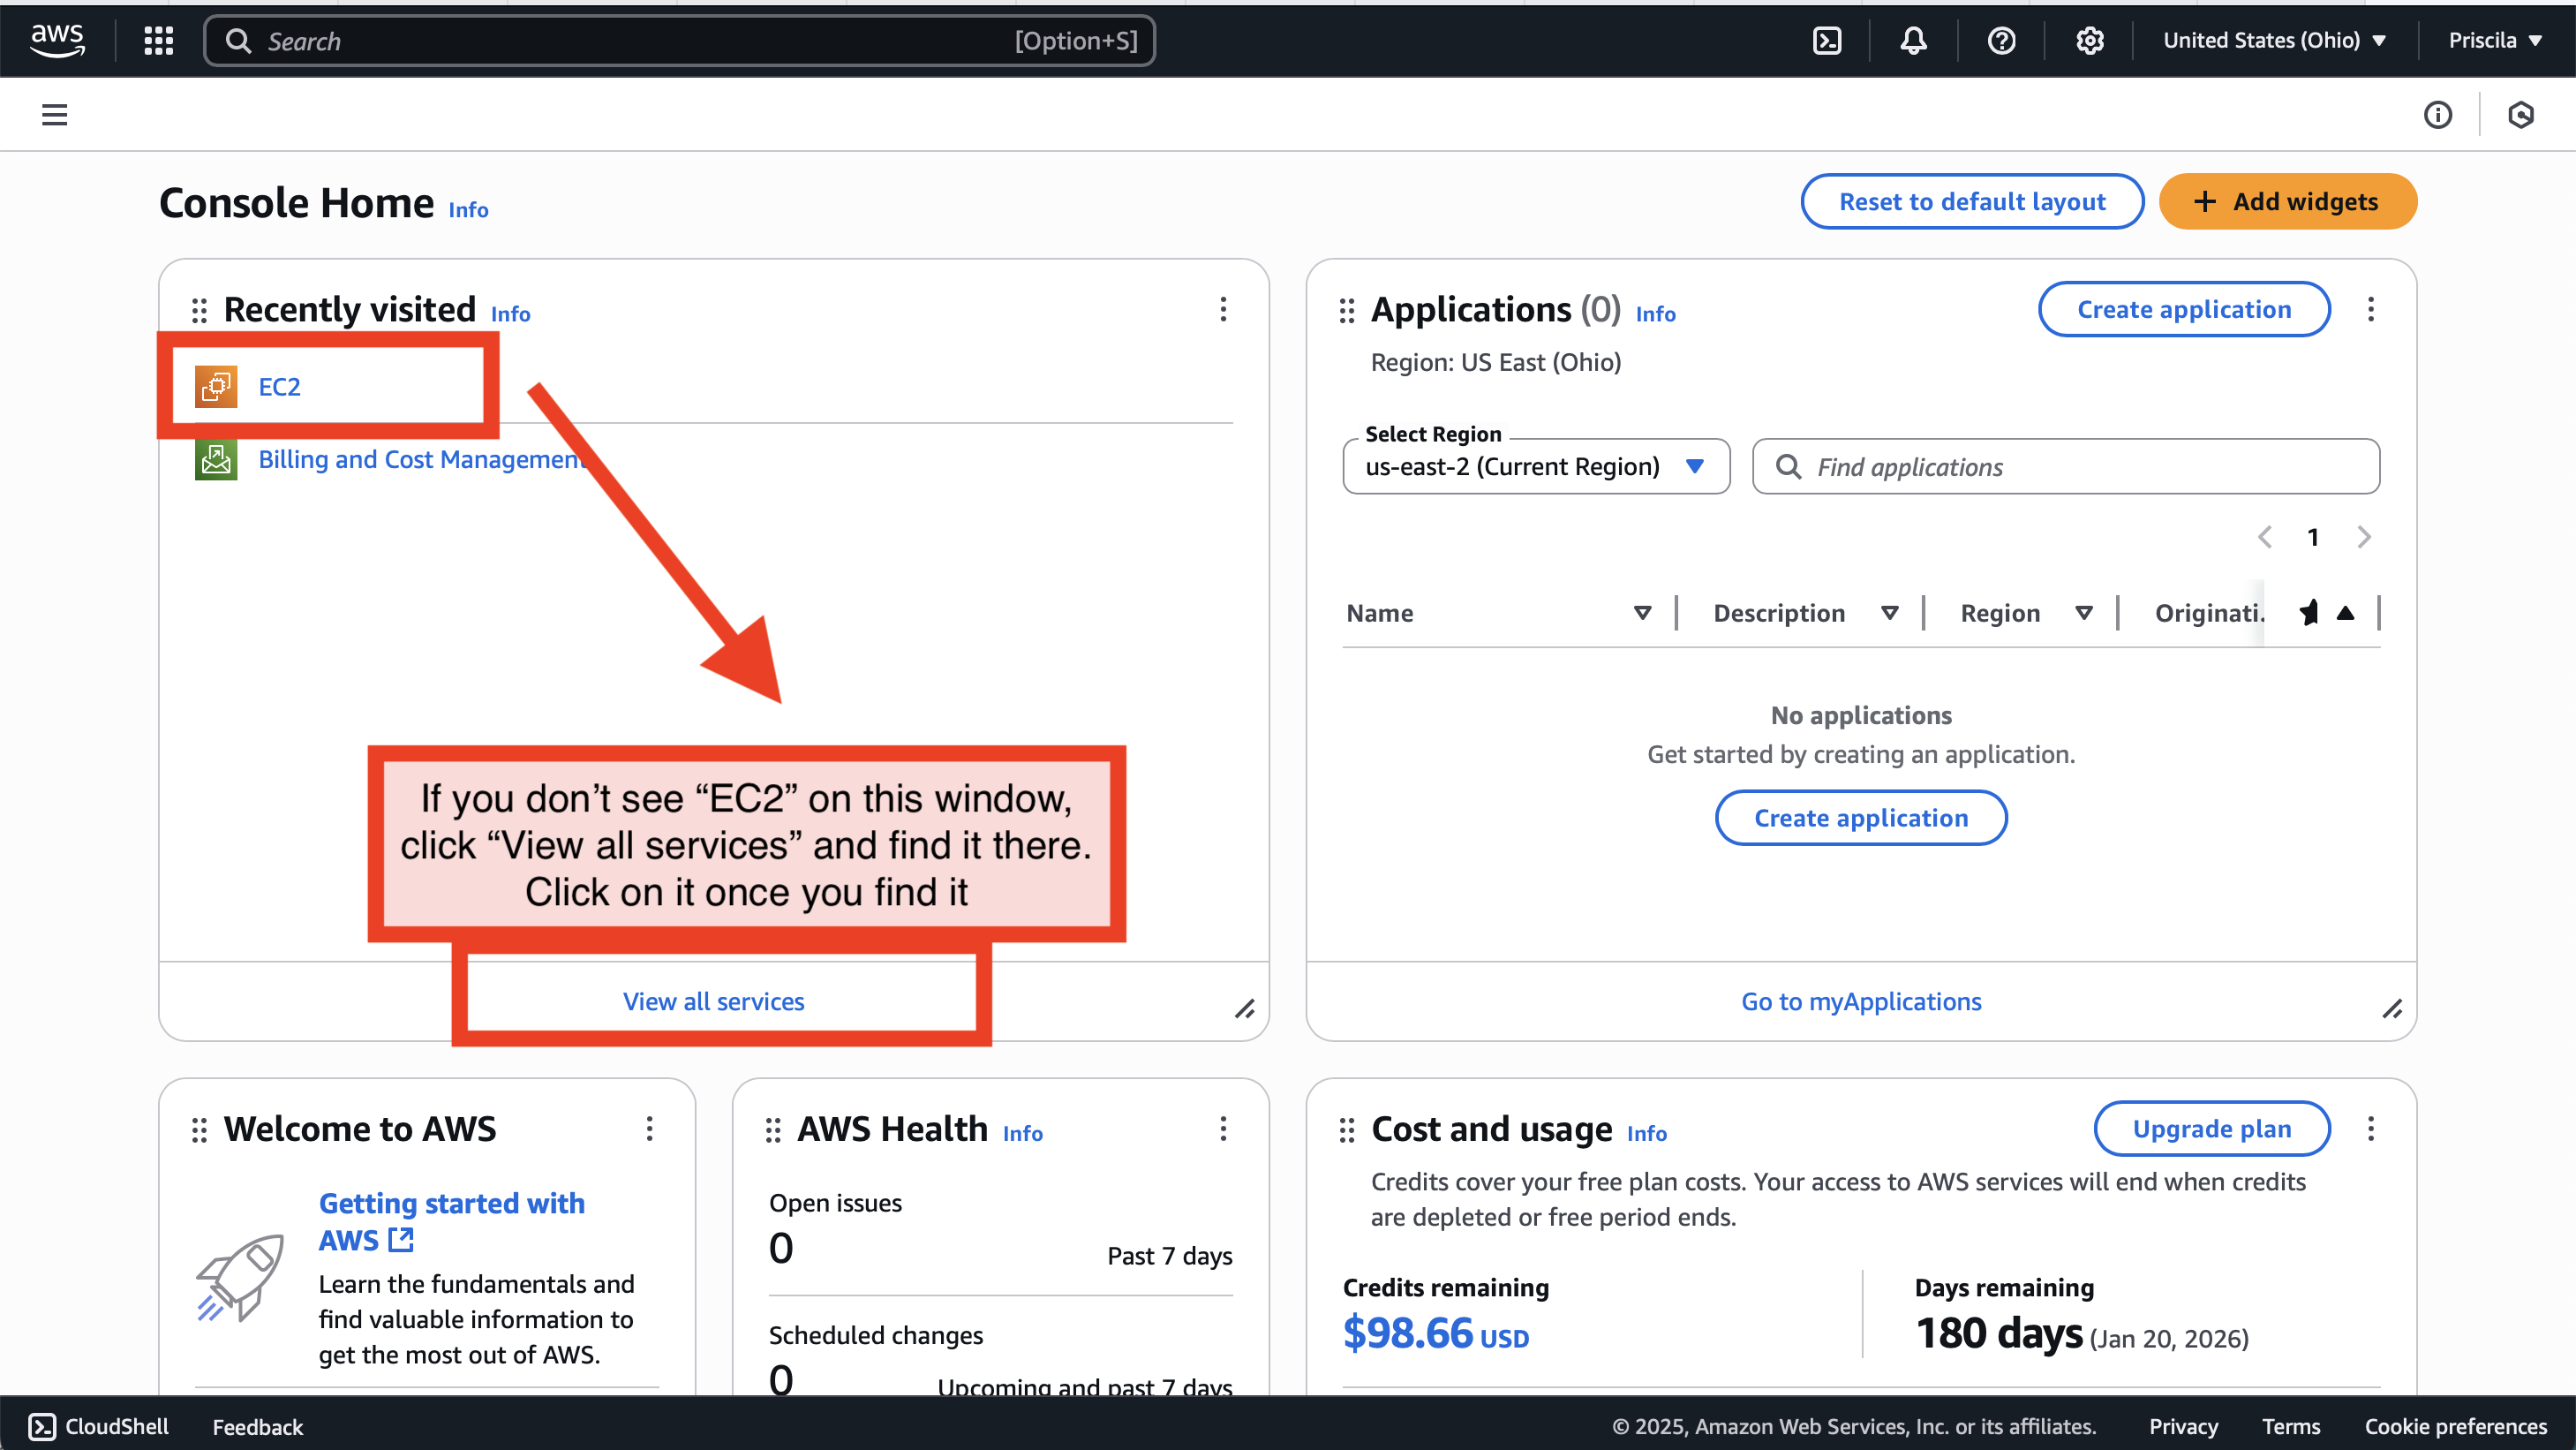
The EC2 Manager lets you manage and launch Instances, which are virtual machines that you configure.
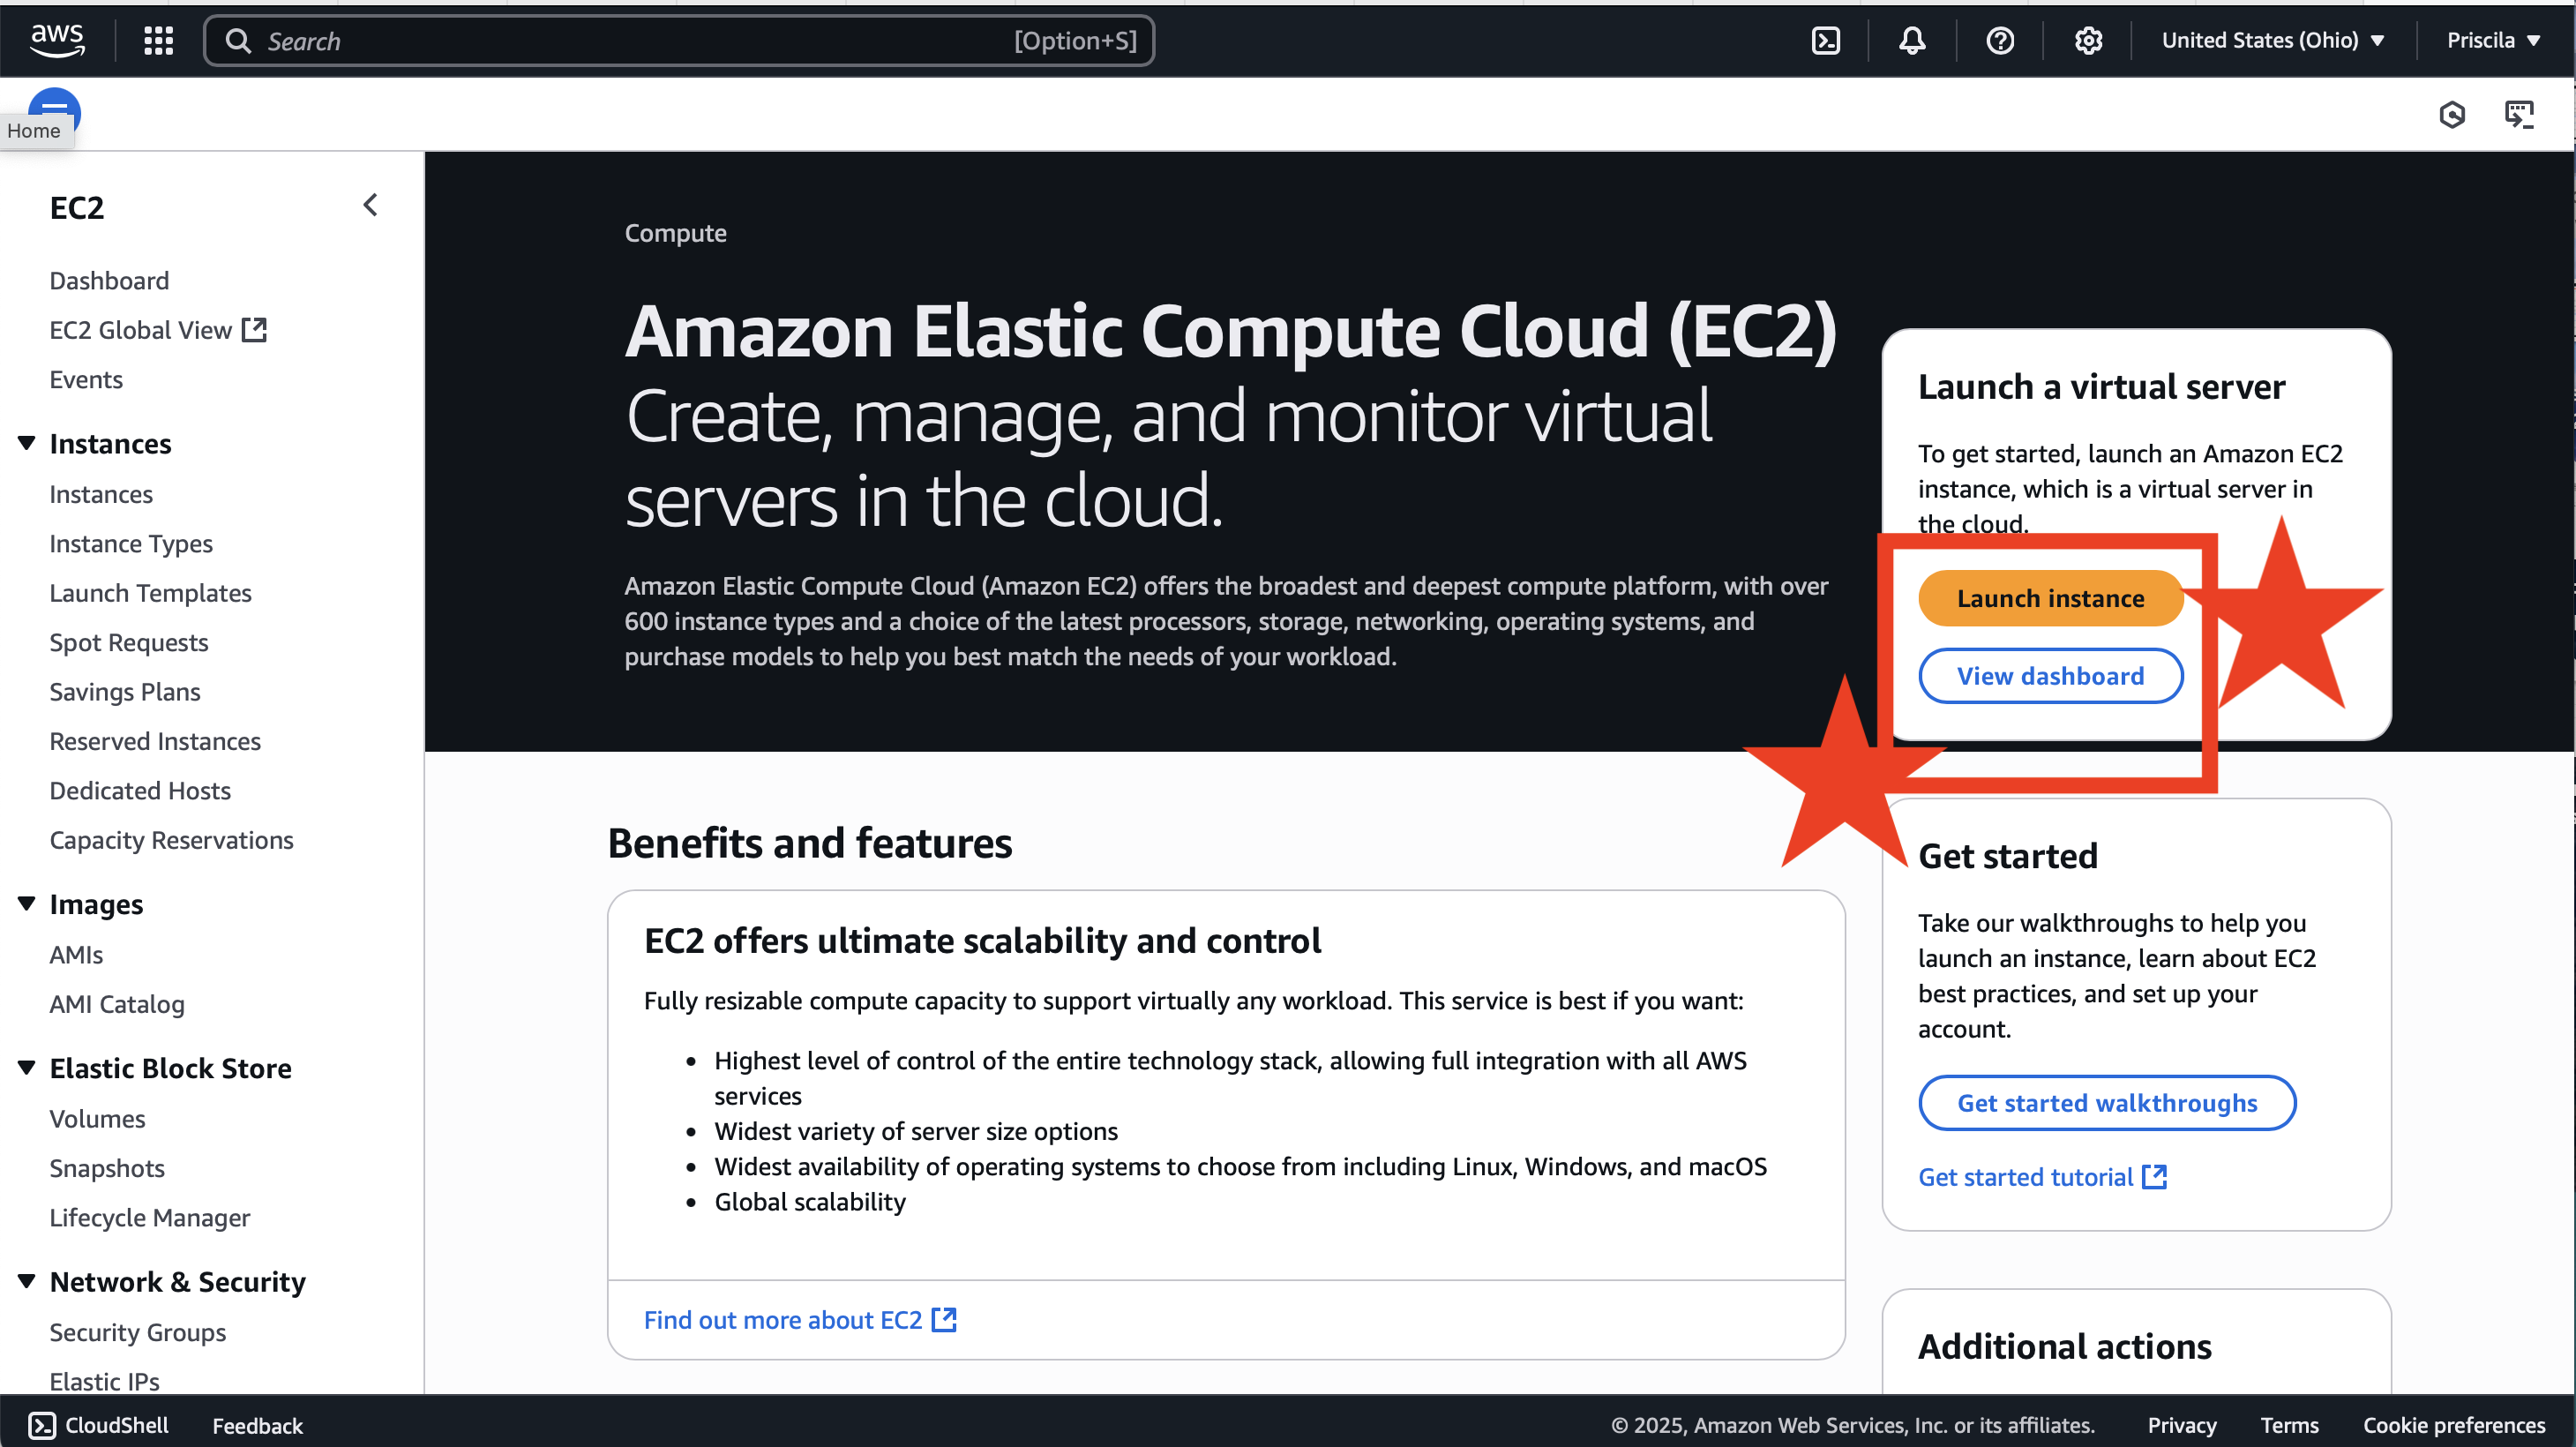
The first thing we need to do is configure and launch a new instance.
Click the Launch Instance button, shown on the right side of
the screen below:
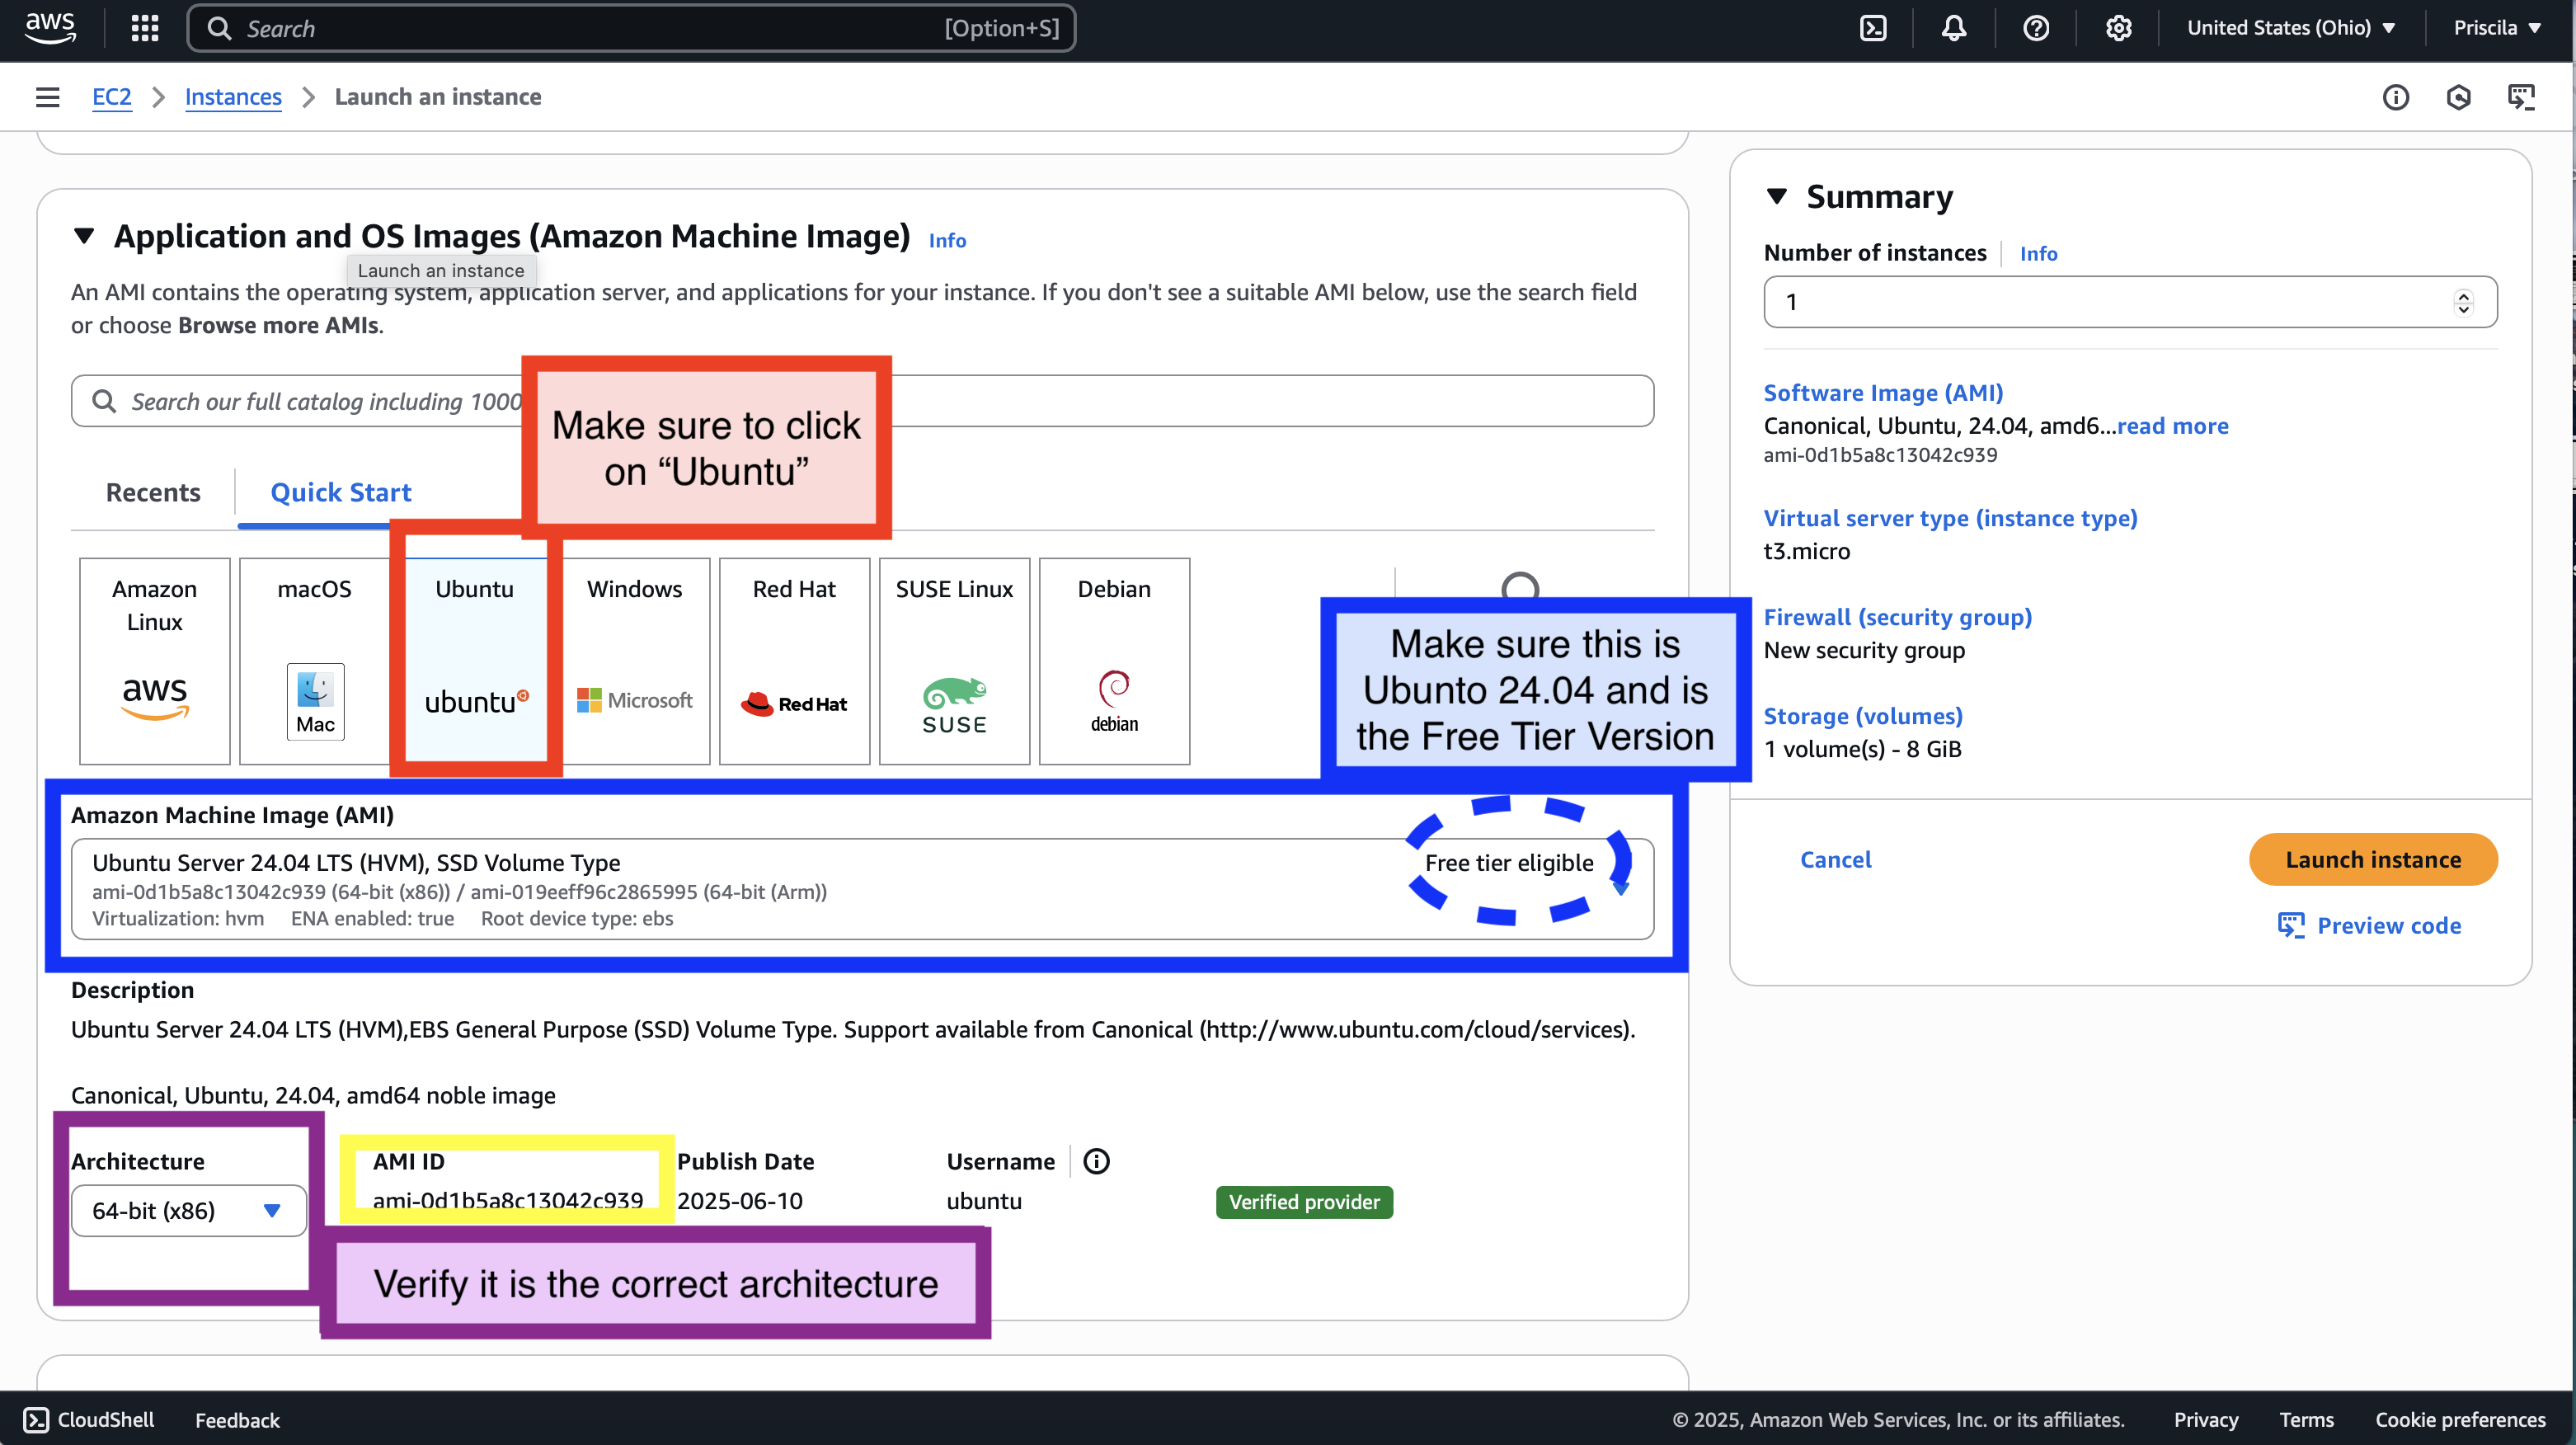
(4) Choose an Ubuntu Server 24.04 and Instance Type
The Most Important Step: You must select
ami-0d1b5a8c13042c939 (from the "Community AMIs" tab).
AMI stands for "Amazon Machine Imagine". An AMI is a unique identifier that
specifies a particular machine configuration. If you do not have the right
AMI, then you may not be able to run all of the assignments.
Hint: Some students have reported difficulty finding the AMI in Amazon EC2.
By default, the console shows the Quick Start tab, and our AMI no longer appears there.
If you do not see it, click on the Browse More AMIs tab (on the right side),
click on the Community AMIs tab, and search for
ami-0d1b5a8c13042c939. From there, you should be able to select it successfully.
You may have to wait for it to load for a minute or two. As of January 6,
2026, the course staff verified that this AMI is definitely still available.
Paste it in the "Selected AMI" search bar, search for it in Community AMIs,
and if the Amazon UI moves you back over to "AWS Marketplace AMIs", click
back over to "Community AMIs".
Hint #2: If you're still having trouble finding the AMI, go back and re-do the step where you select the appropriate region. Sometimes that region selection does not stick the first time, and not all AMIs are available in all regions. Then, when you are searching for the AMI in the Community tab, you may have to wait for about 60 seconds while it says "Loading AMIs". Don't give up early!
This AMI corresponds to Ubuntu Server 24.04 LTS (HVM), SSD Volume Type, but please use the numerical AMI to be certain, since there are multiple "Ubuntu Server 24.04" configurations. This image contains the environment required to complete the assignments. Make sure that the architecture is listed as 64-bit (x86), not ARM.
The screenshot below shows all of the elements to double check:
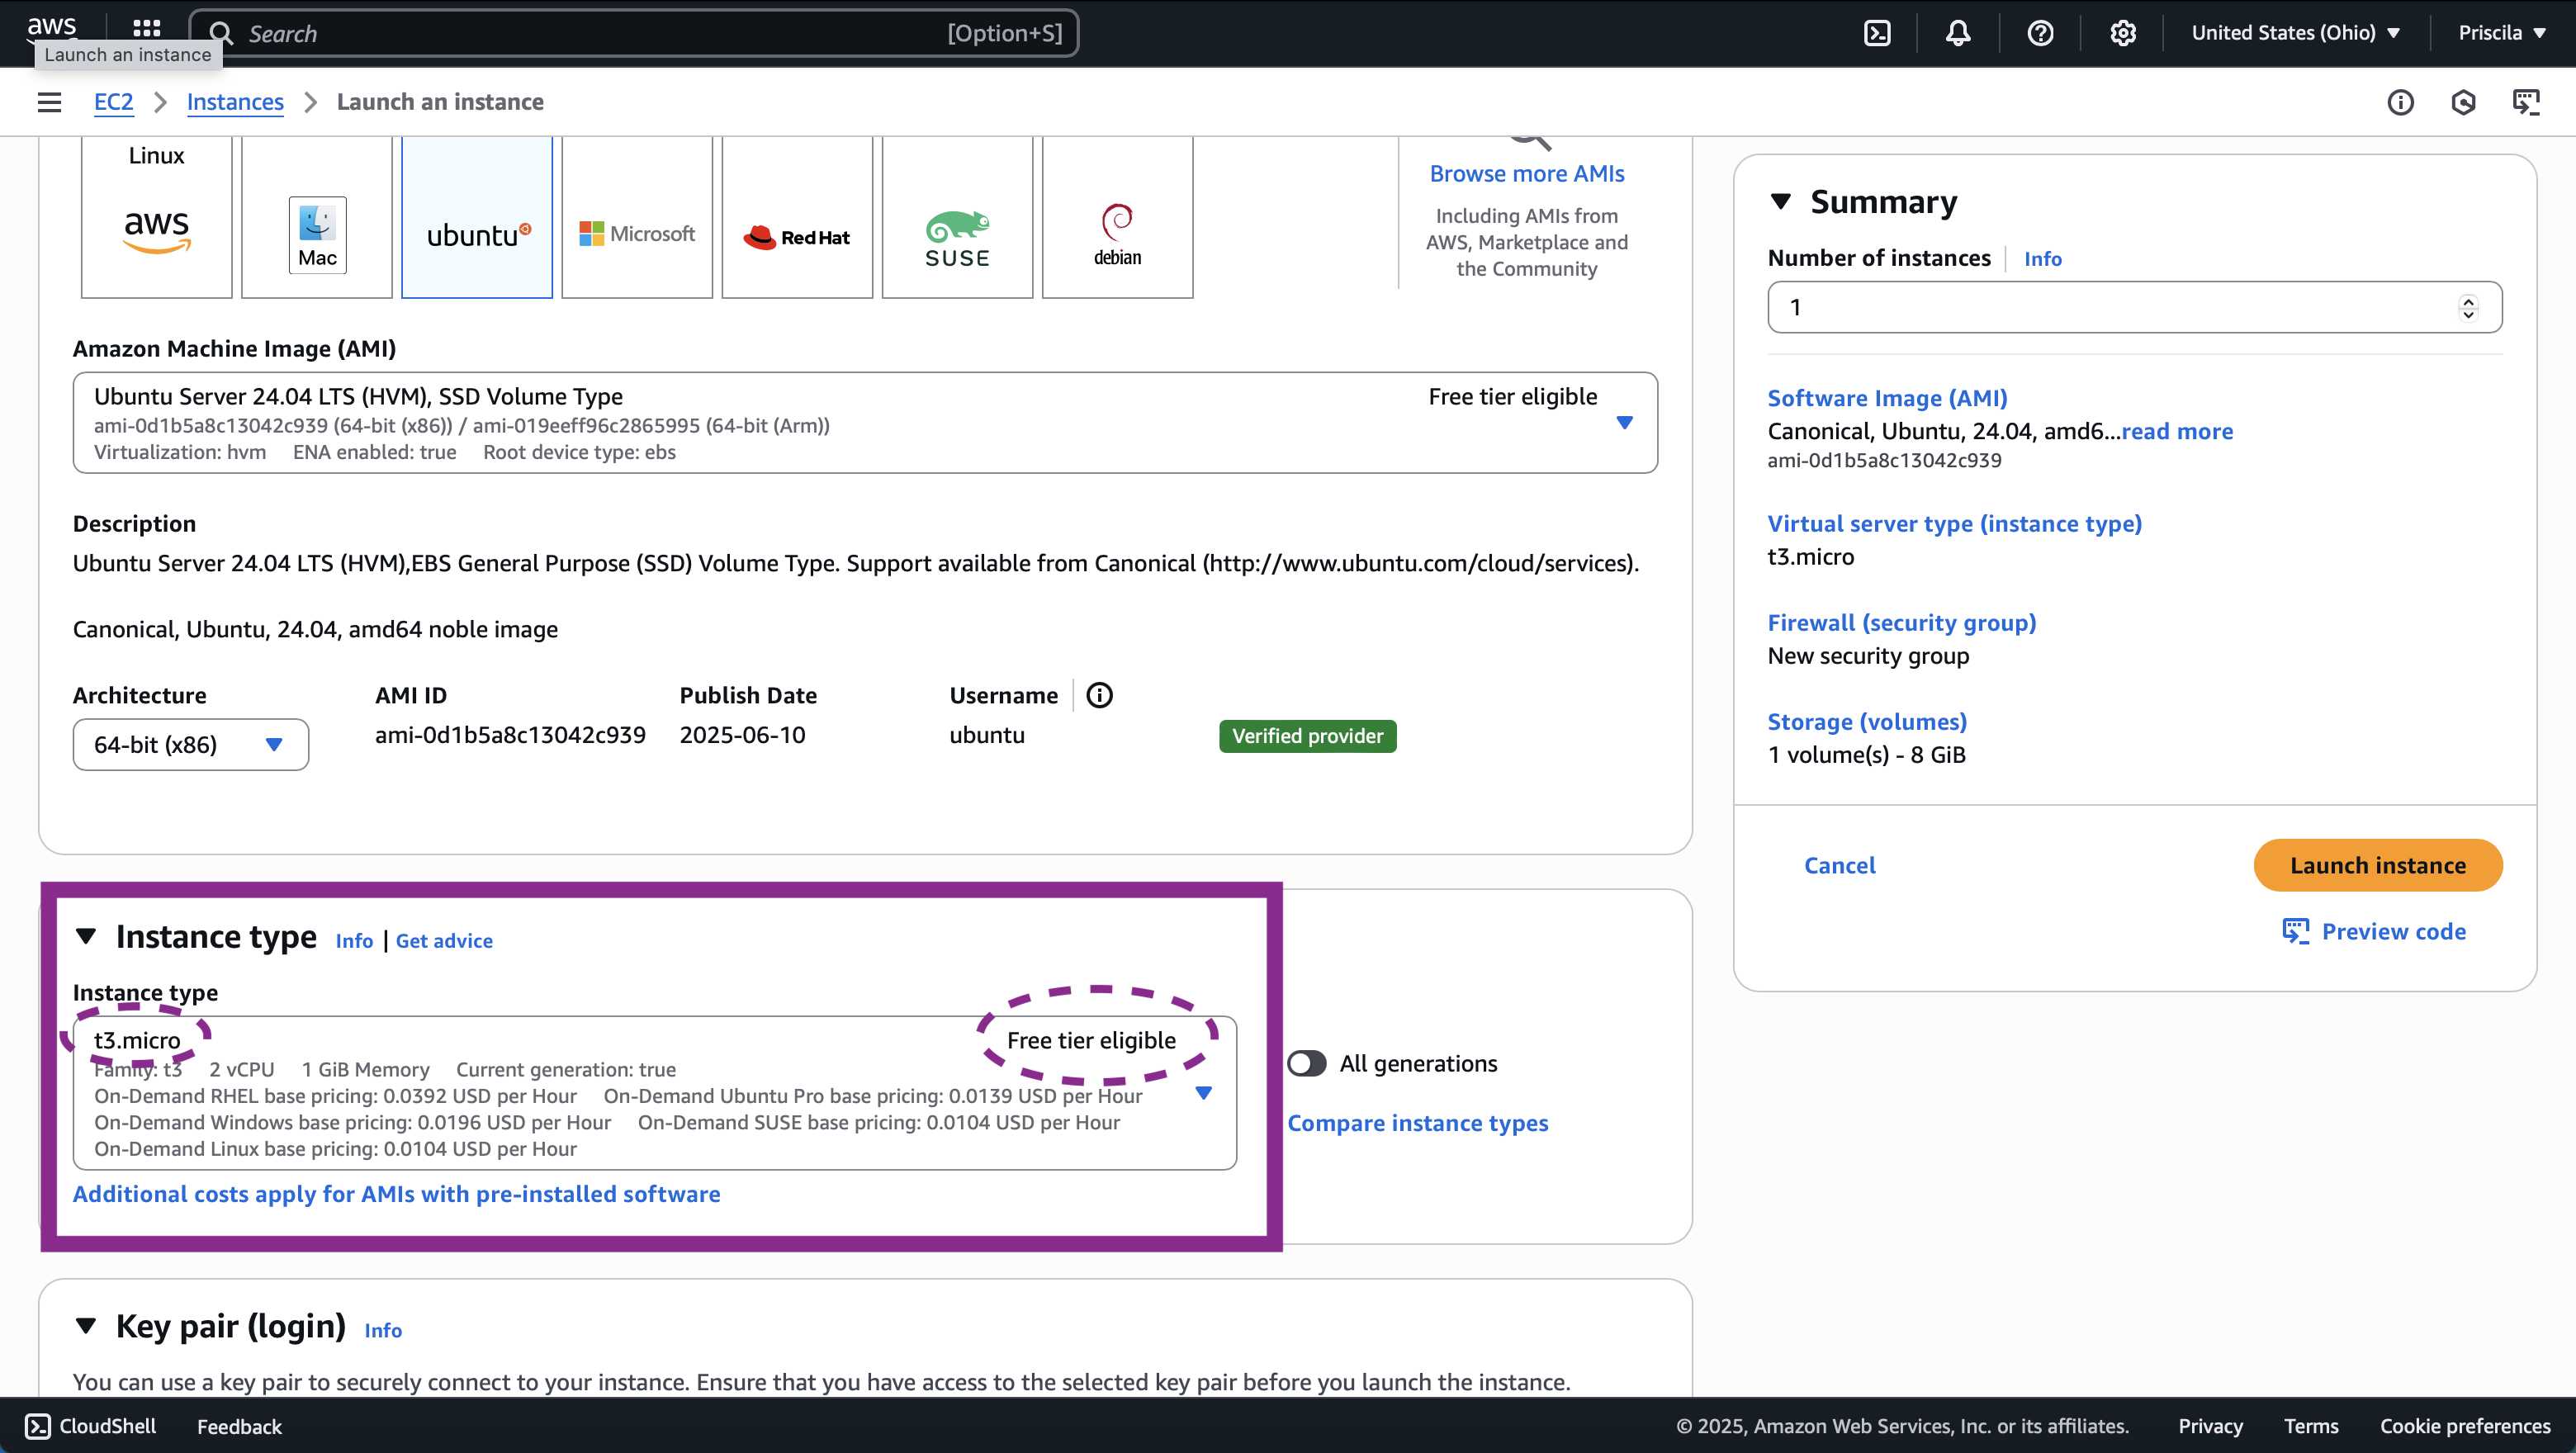
Next, choose the instance type. Select t3.micro — this is the free tier eligible instance type, and it will be clearly labeled as such. (Do not panic if your only free tier is t2.mirco: this will still allow you to complete assignments, it may just be a tad slower) Do not select ARM-based or other incompatible instance types, as they may not run the course tools properly and could result in charges. The screenshot below shows the t3.micro selection, as well as confirmation that it is free (do not worry if it is not and only t2.micro is free - please see FAQ):
(5) Configure Authentication (Keys for SSH)
Next, Amazon has you set up a way to login into your instance (via SSH) before you finish creating it. You have root (Administrator) access to your new instance. However, we also want to make sure that no one else can login to your machine. This is addressed using asymmetric key encryption (like RSA). Basically, Amazon send download a file that serves as your credentials. Rather than entering a password, you will use this special file to login. Courses such as EECS 388 or EECS 485 provide more information about asymmetric key encryption.
Select Create a new key pair in the "Key Login" box and type in a name such as eecs481 (see the screenshot below). Be sure to pick "RSA" and not any other option (like "ED22519"). Then, click Download Key Pair. Despite the phrase "Pair", you will only download one file for this Key Pair (the "Pair" terminology relates to asymmetric key encryption).
It is imperative that you keep this file in a secure location. Do not upload it to GitHub. This file is basically like a password for accessing your cloud computing instance — you wouldn't want someone malicious to access your instance and do something bad with it.

Be sure to download your key file. Check where it downloaded and be sure to store it in a good location.
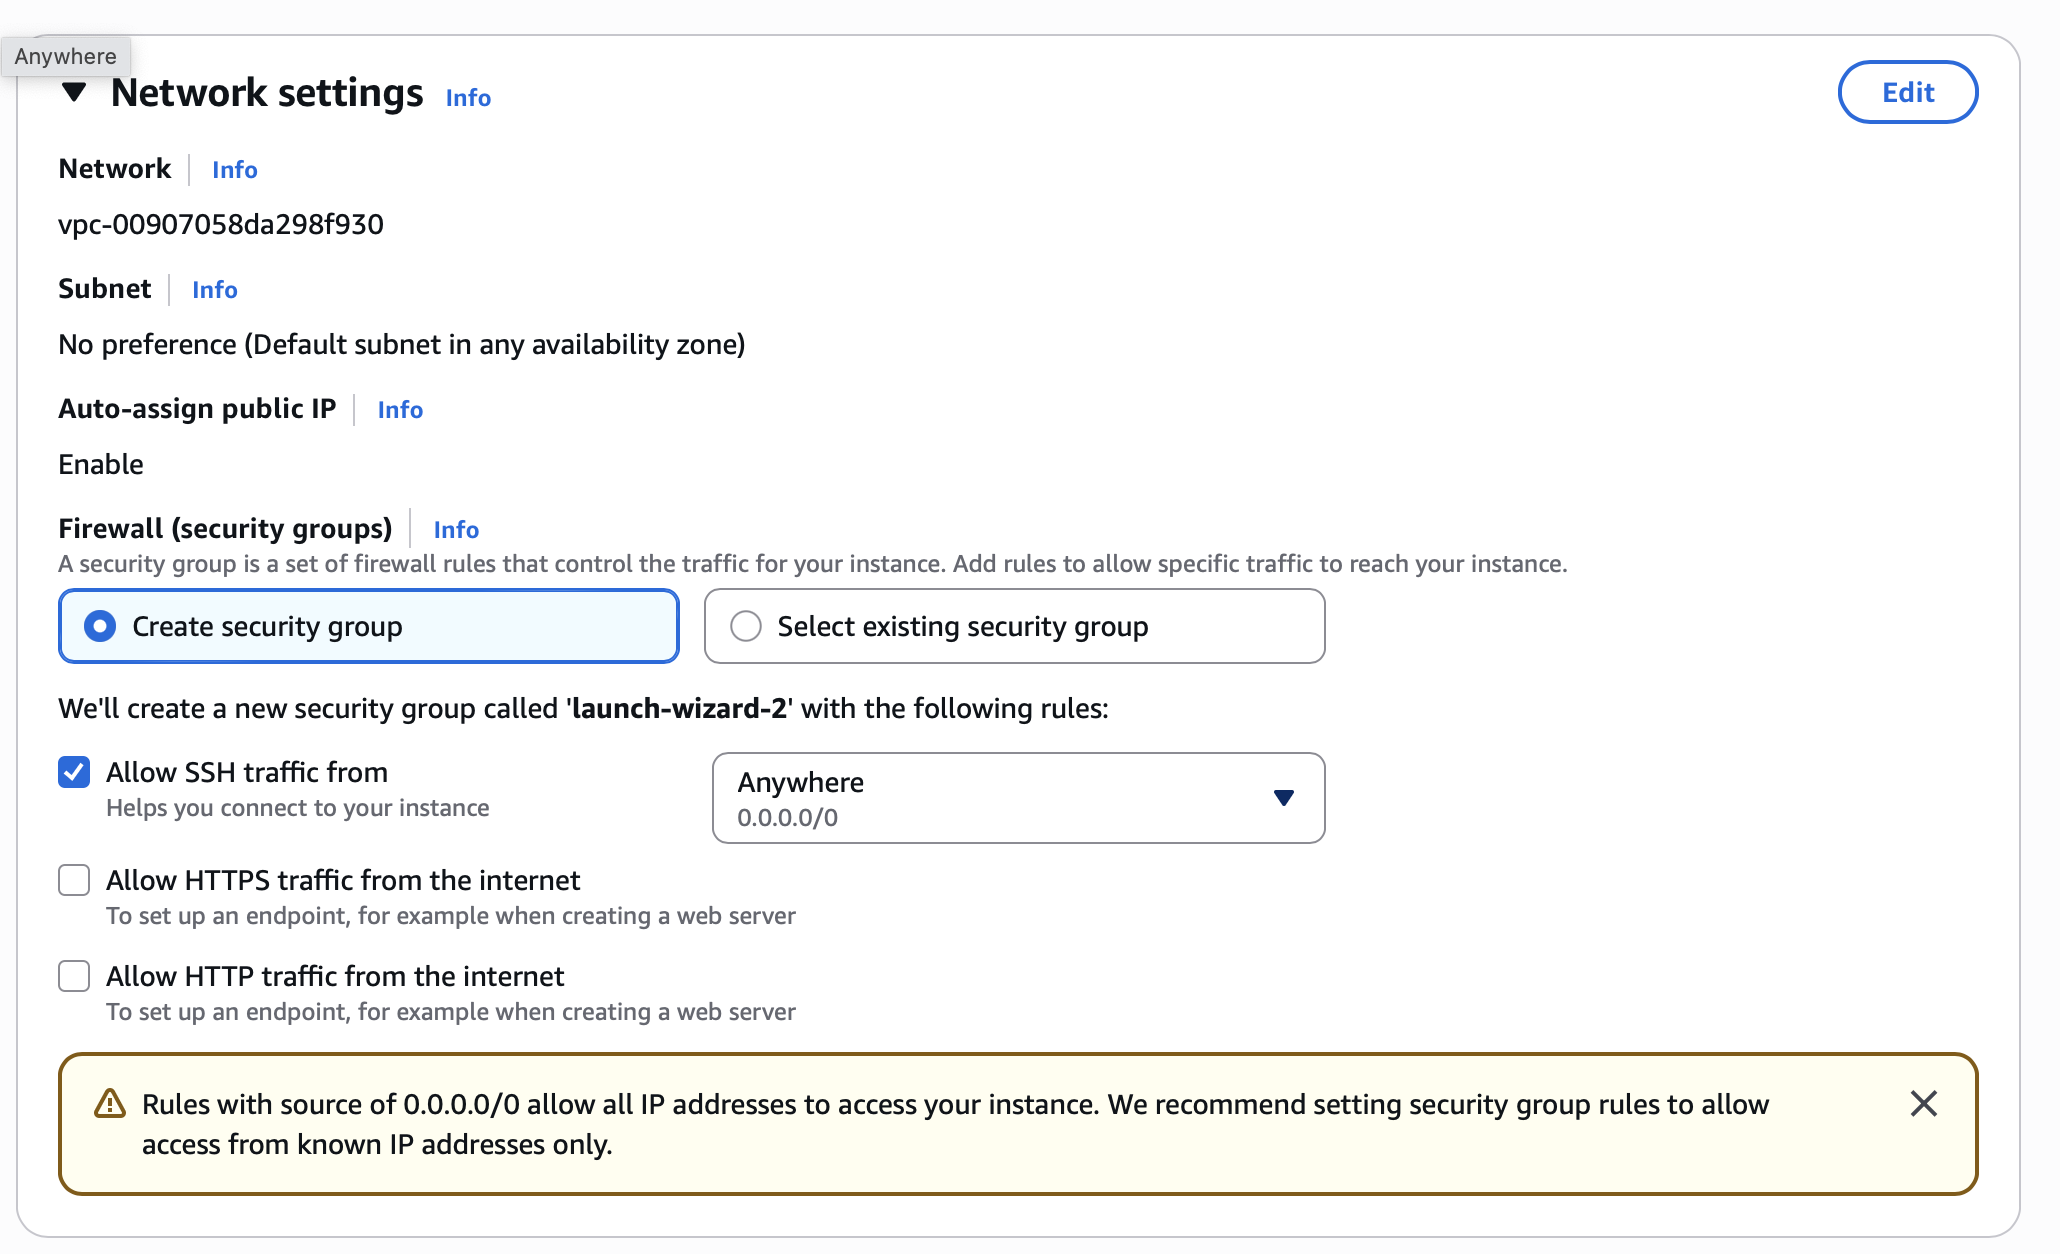
(6) Configure Network Settings
In this step, you will see options for networking, such as VPC, Subnet, and Auto-assign Public IP. For this course, you can keep the default values:
- Network (VPC): Leave this as the default VPC (e.g.,
vpc-xxxxxxxx). This is the virtual network your instance will run in. - Subnet: You can leave this as "No preference". AWS will automatically place your instance in a default subnet in one of the available zones.
- Auto-assign Public IP: This should be set to Enable. This allows you to connect to your instance over the internet using SSH.
Under Firewall Settings (Security Group), you specify a virtual firewall that controls incoming and outgoing traffic for your instance. By default, AWS will offer to create a new security group with the following rules:
- Allow SSH (port 22) from Anywhere (0.0.0.0/0): This is required so you can connect to your instance from your computer using the terminal.
- Allow HTTP and HTTPS: These are mainly needed if you're running a web server. We will not use these in this course so make sure they are removed (i.e., not selected).
Allowing SSH from 0.0.0.0/0 means that any IP address on the internet can attempt to connect — which is fine for our short-term class setup but is not ideal for production. If you're on a shared network or want more security, you can restrict access to your own IP.
For this course, keep the default security group settings. This will will allow your instance to be reachable via SSH.
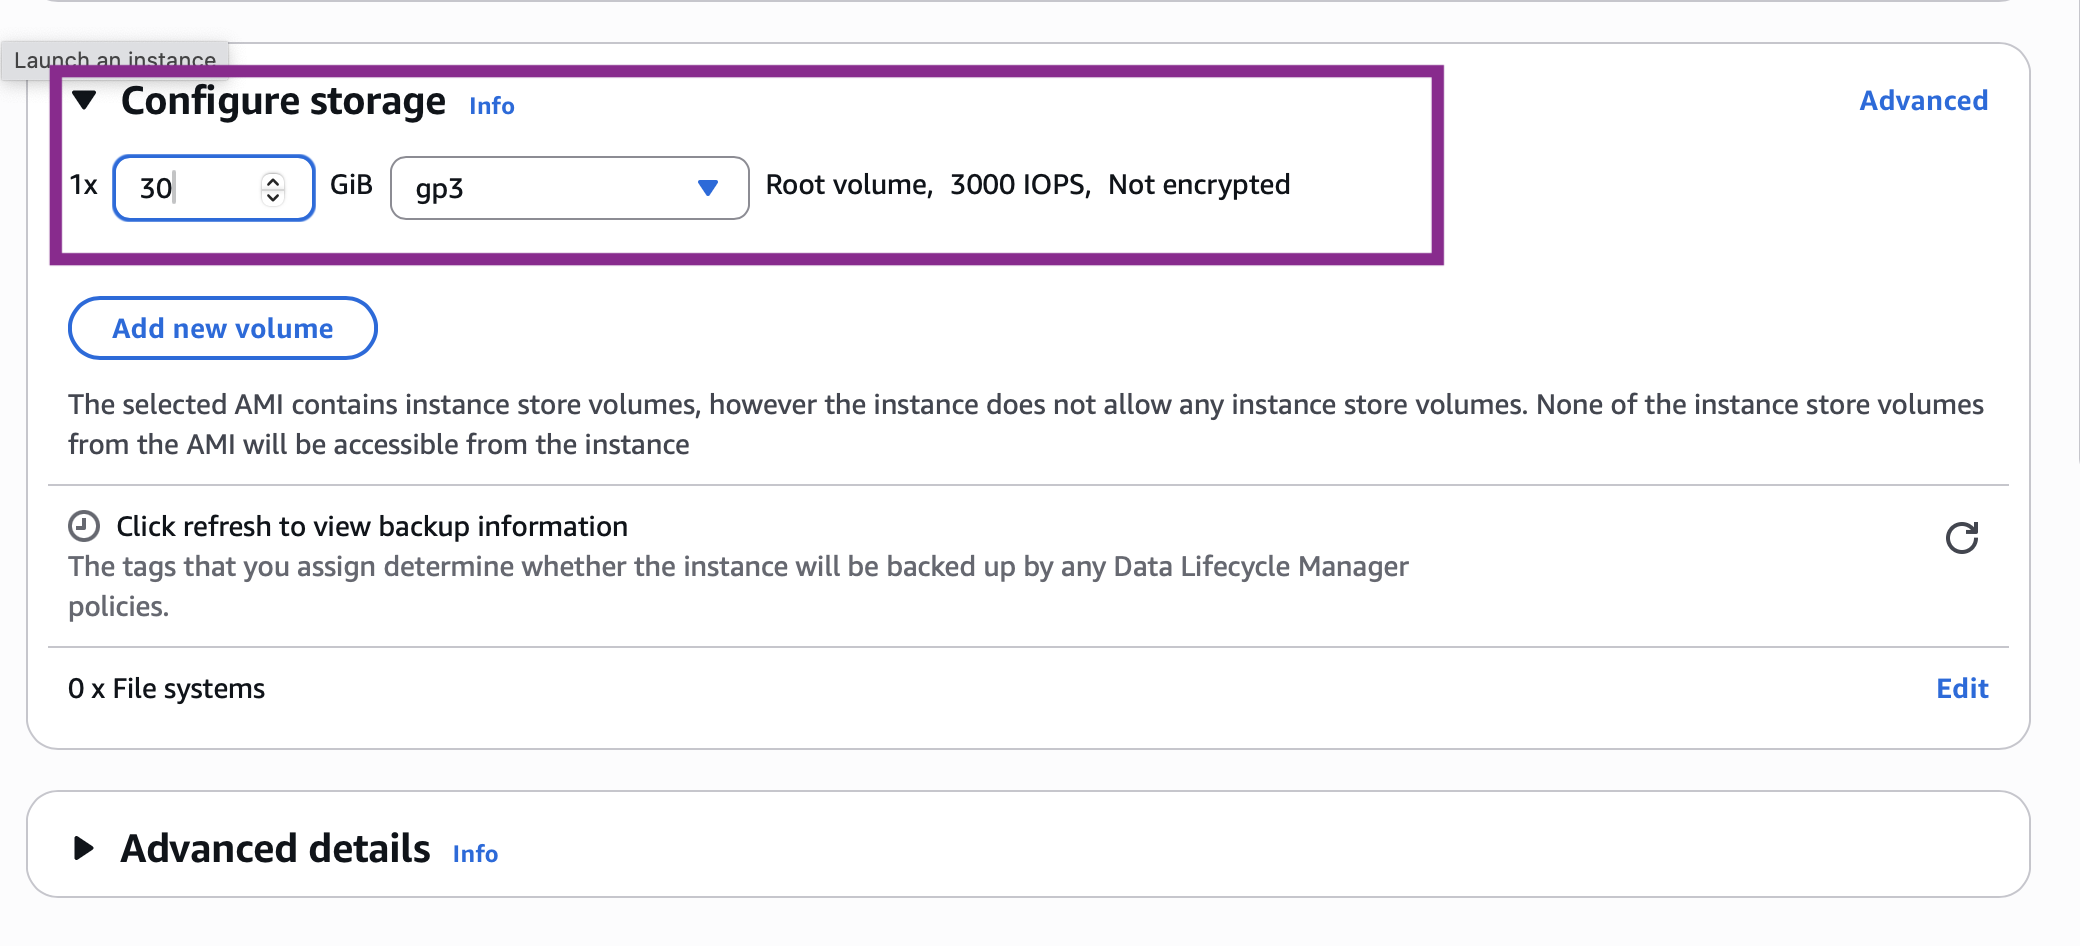
(7) Configure Storage Settings
We recommend selecting 30 Gigabytes for the volume or disk size. This is the maximum size available for the free tier. The default may be 8 GiB, but students sometimes hit that limit during EECS 481. (You can complete all of the assignments with a 10 Gigabyte volume, but you may have to move HW1, HW2 and HW3 files off to separate storage and delete them to make room for HW4 and HW5, etc. Just select 30 GB and avoid hassle.)
(8) Connect to Your Instance
At this point, you should be ready to launch your instance by clicking "Launch instance".
You have set up an Ubuntu 24.04 instance on EC2 and created associated credentials.
You now have a virtual machine running in the cloud that you can connect to.
(You may have to wait 30 seconds after launch before the instance has
booted up and is ready for connections.)
Much like accessing CAEN, you will use ssh to connect to your instance.
This is the recommended way — you could technically install a front-end and use
remote desktop software, however we strongly recommend using the command line, since you
will be using the CLI in many of the course assignments.
From the EC2 Management Dashboard, click on your running instance. This will enable (un-grey) the Connect button, which allows you to access your instance via SSH.
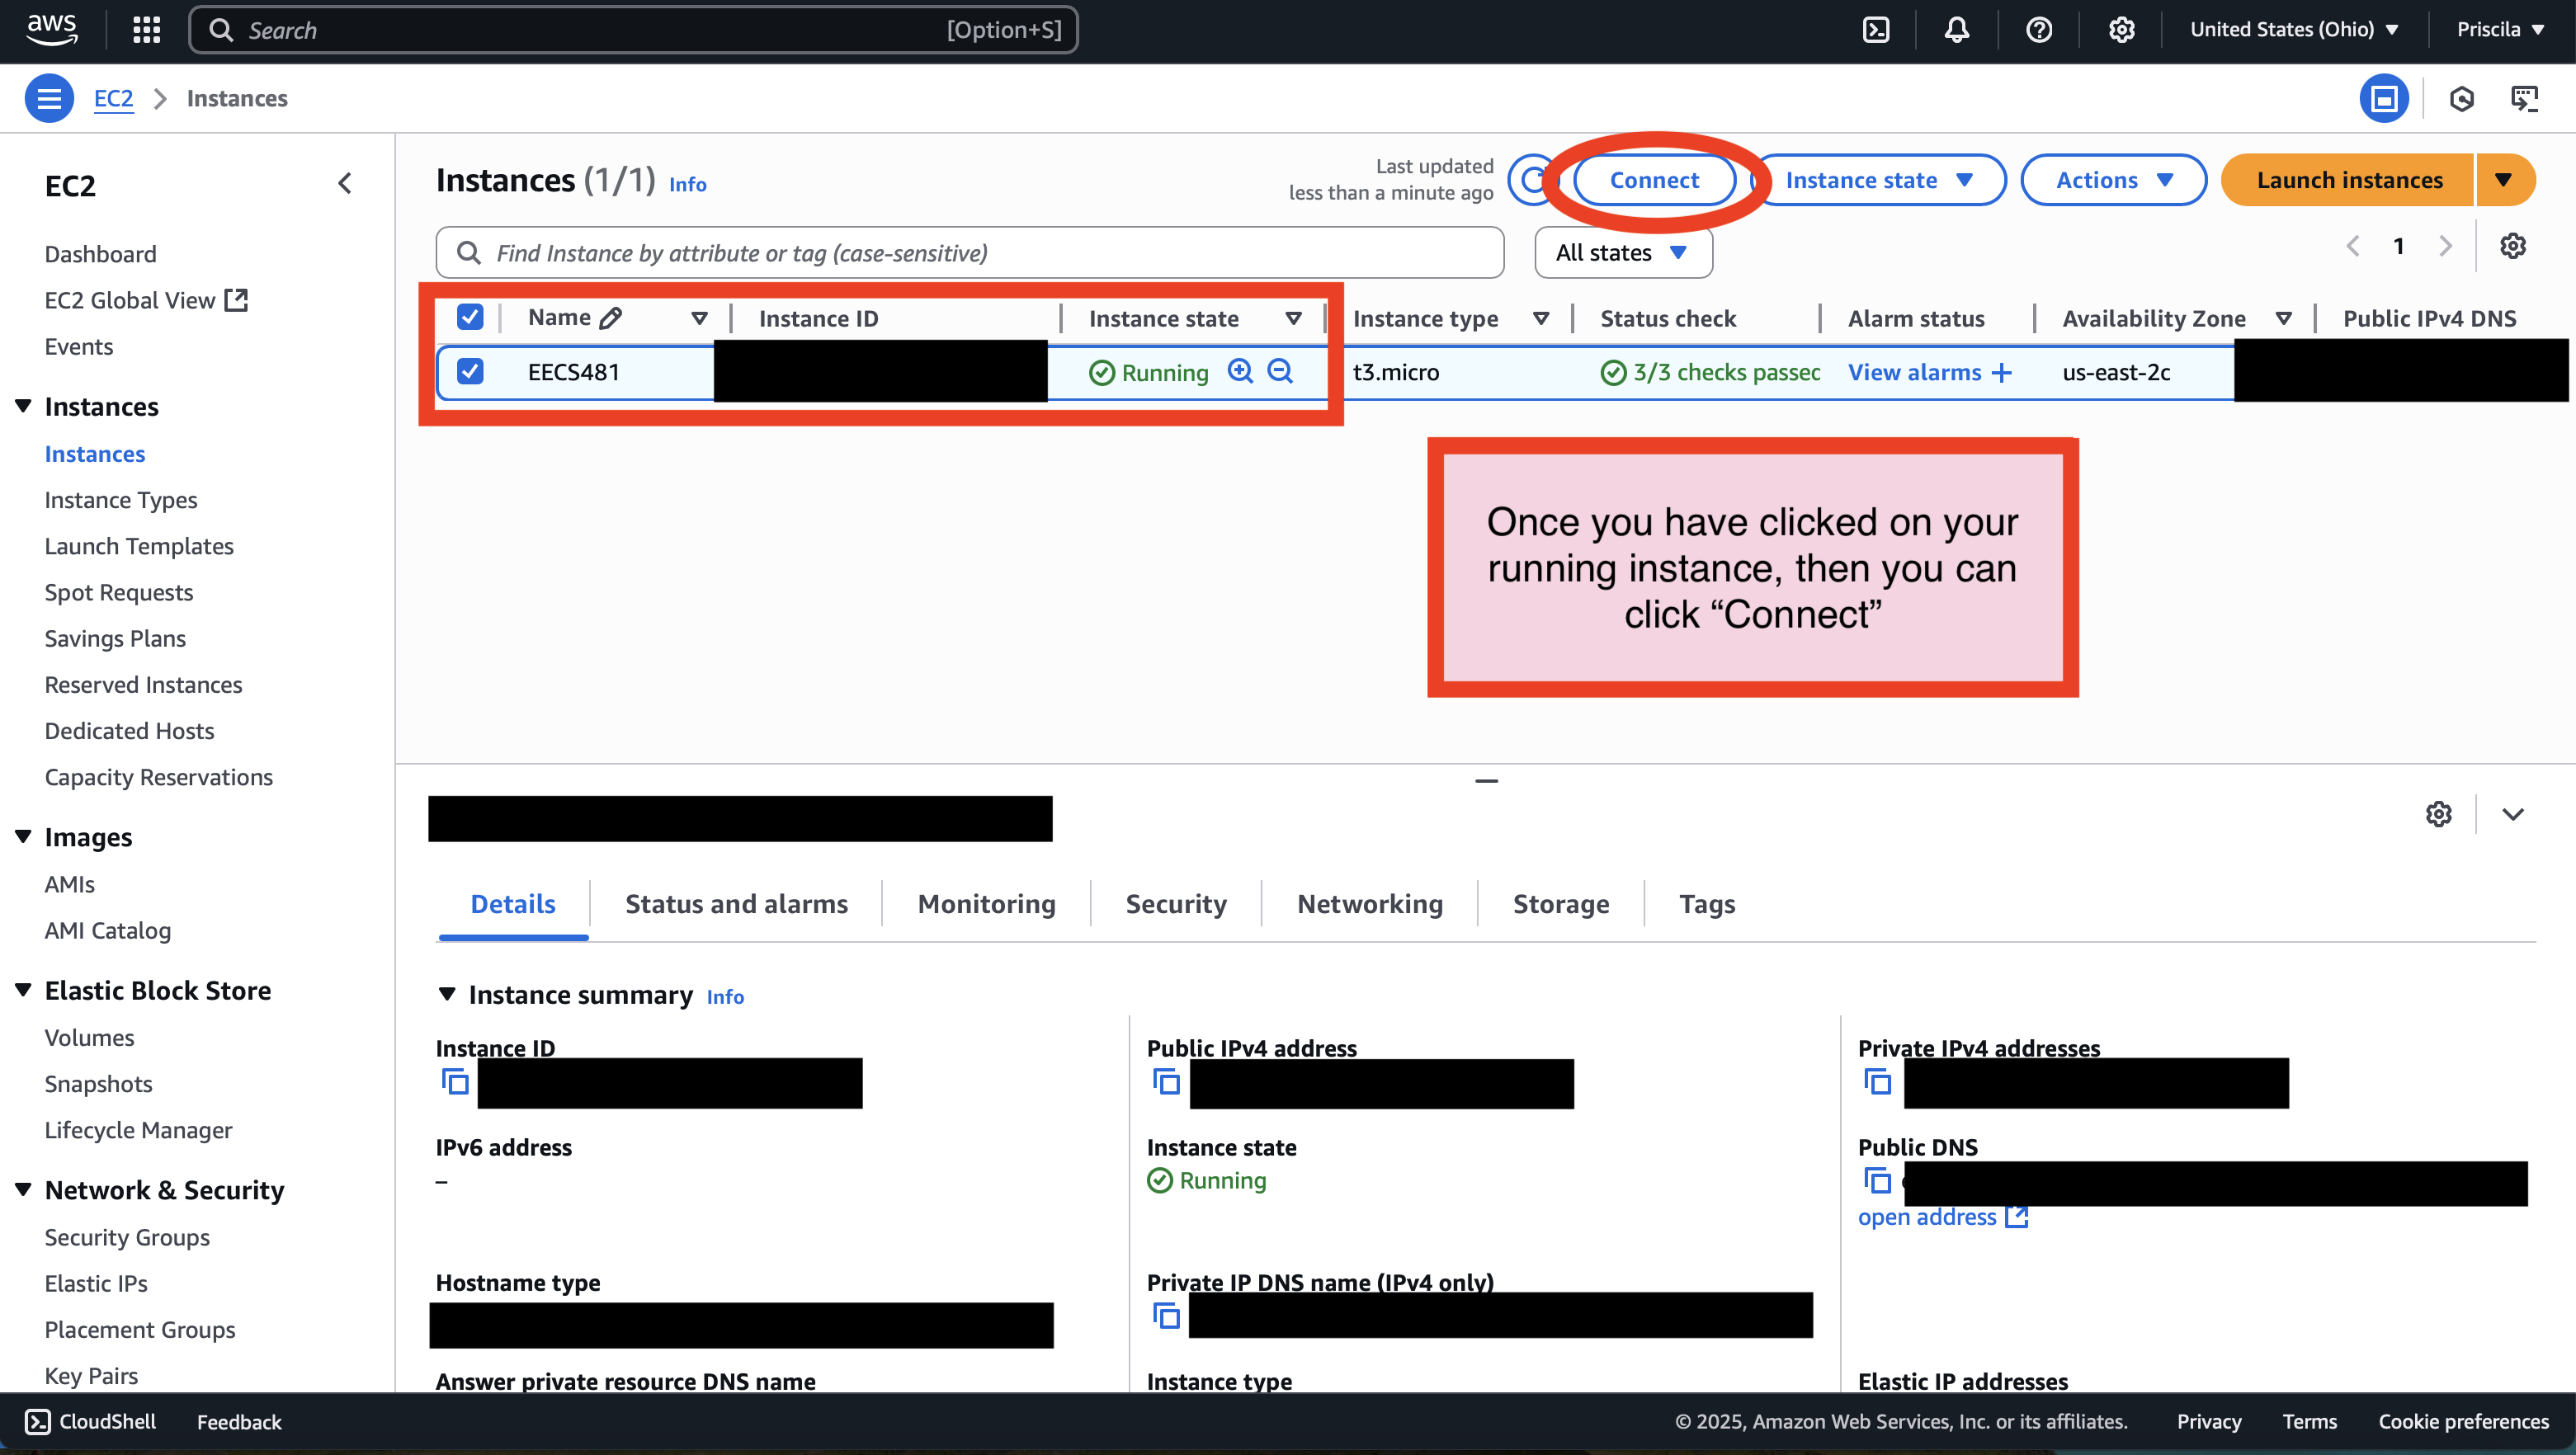
Pick the SSH Client tab to see how to connect via ssh:
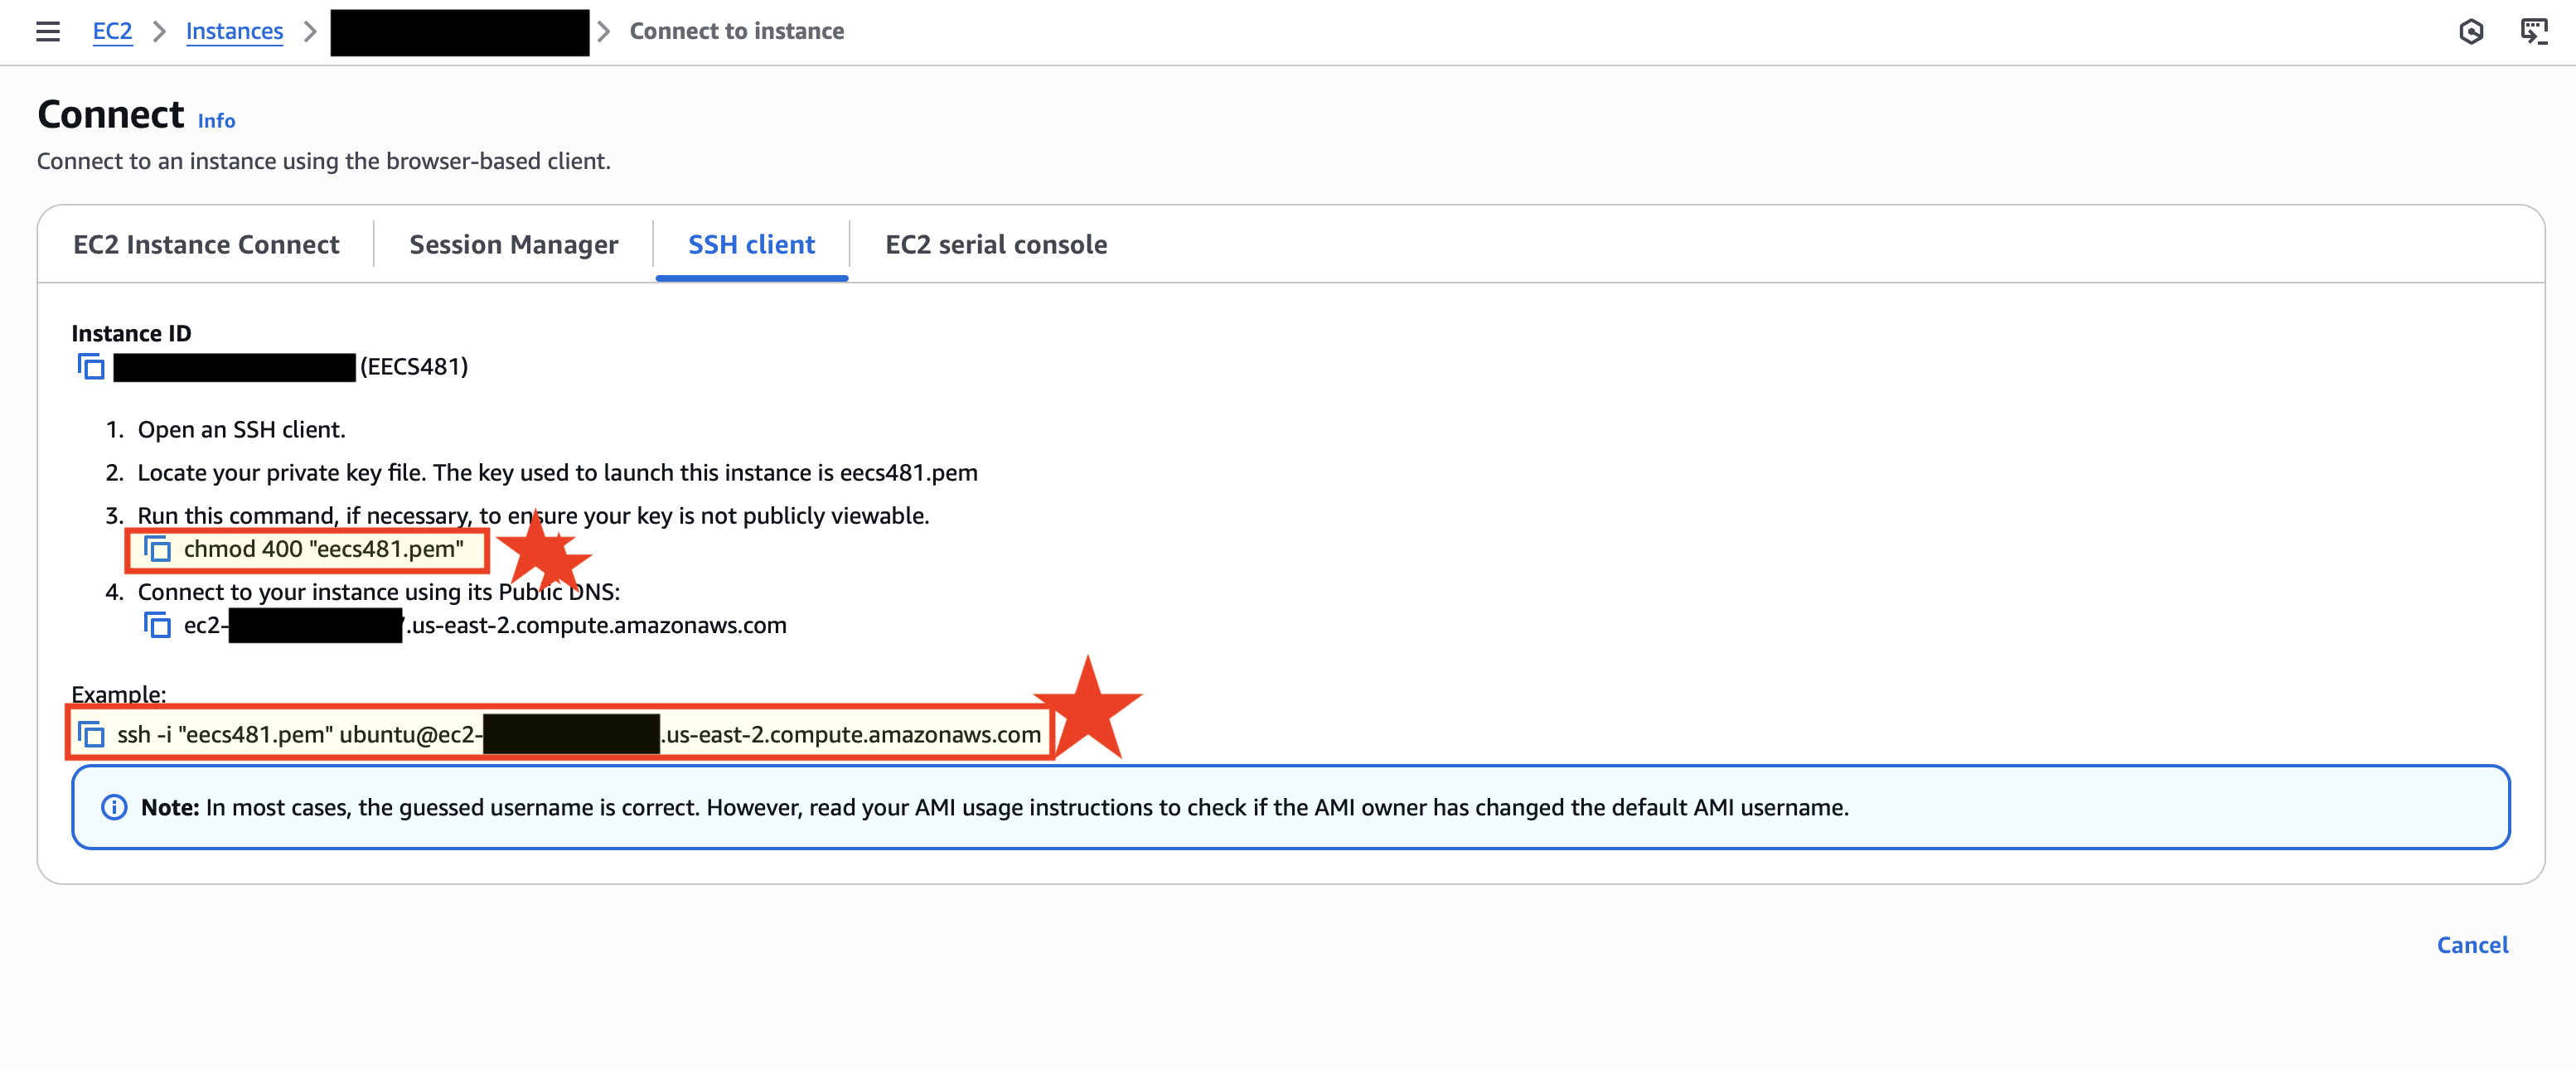
On this window, you will see the hostname of your EC2 instance to which you can ssh, as well as a number of instructions for connecting.
Some students, especially those using Mac computers, report receiving permission errors when they try to SSH into their EC2 instances:

In this case, a command like ...
chmod go-rwx /path/to/eecs481.pem... usually resolves the issue. More information is available online about this SSH issue.
Using Windows WSL to SSH to EC2
If you are using Windows Subsystem for Linux (WSL) to connect to your Amazon EC2 instance, you must prepare your key file before connecting. Our recommendation is to run the following (but use your path):
mkdir -p ~/.ssh/
cp /path/to/your/downloaded/eecs481.pem ~/.ssh
chmod 400 ~/.ssh/eecs481.pem
Windows WSL does not apply Linux file permissions correctly unless you are dealing with files contained within the Linux FS. Moving your key to ~/.ssh/ will allow you to chmod 400 appropriately. The SSH client will not allow you to connect to any server using that key if it does not have the correct permissions.
Recall you downloaded a eecs481.pem file when you set up authentication for your instance (see part 5 above). You must specify this file on your SSH client to connect to your instance.
First, you must provide the correct access permissions
to the eecs481.pem file. Usually, this means running chmod 400 /path/to/your/eecs481.pem. Once you do so, you can use the ssh command directly:
ssh -i /path/to/your/eecs481.pem ubuntu@put-your-EC2-hostname-here
(You must substitute in the path to your downloaded eecs481.pem file as well as the hostname of your EC2 instance, which takes the form of ec2-X-Y-Z.us.W.compute.amazonaws.com for some values of W, X, Y, and Z.)
If you receive an error that the path is too long for Unix domain socket or the like, open ~/.ssh/config in a text editor and modify the control path to match this (reference):
Host *
        ControlPath ~/.ssh/control/%C
        ControlMaster auto
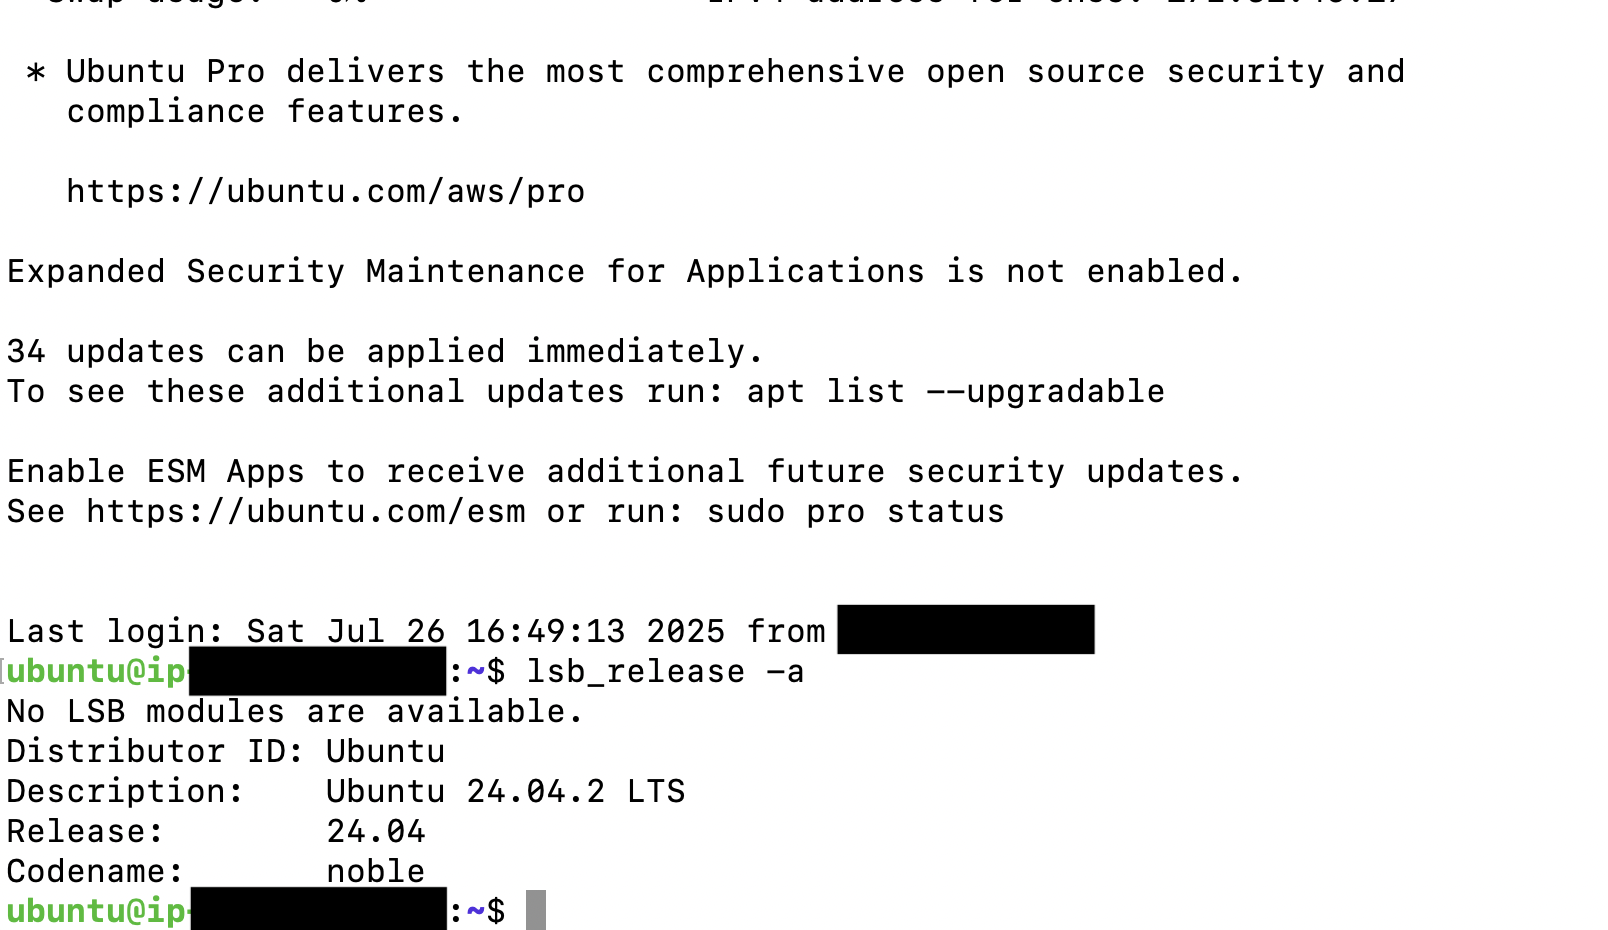
At this point, you should be logged in to your EC2 Instance! See below for an example of connecting to such an instance from the WSL environment:
Then, you can proceed to Submitting the assignment below!
You can safely stop the VM instance when you aren't using it (e.g., between homeworks) and restart it when you are.
Easy File Transfers and Not Losing Work
You can make the files stored remotely on your EC2 instance behave just like a local folder on your computer. This allows you to use drag-and-drop to copy files and to use your favorite local editor (e.g., VSCode) to edit remote files. Many students find this much easier than using a remote text editor (like Nano) or copying files back and forth all the time (it's easy to get the wrong version or copy over something).
It is also possible to make sure that long-running jobs that you start on the remote EC2 instance are not terminated if your network connection drops or if your local computer is turned off. Many of the later homeworks have utilities that take multiple hours to run. It is very convenient to be able to start them, turn off your computer for the night, and have the work continue in the background, even while you are not looking at it.
This video guide explains how to use SSHFS and screen to do both of those things:
Warning: Visual Studio Code's SSH Plugin
Many students have reported issues using VSCode's SSH plugin to transparently access files on the VM instance. The plugin claims to make remote files appear just like local files, allowing you to use a friendly IDE, but the student experience is that the instance randomly and eventually "hangs" and has to be restarted or terminated. Unfortunately, the VSCode SSH plugin is not under our control, and until that bug is fixed by its maintainers, we cannot recommend it.
Students with incoming systems preparation (or who would like to take this opportunity to learn more about networks and filesystem integration) might consider using something like SSHFS instead, after which any local editor can access remote files transparently.
Submitting HW0
Complete this assignment through autograder.io (as per the main course webpage). For HW0, you are asked to submit two files: output.txt and (optionally) second.txt.
(1) Obtaining output.txt
You will use a special script we provide to verify that you have set up the EC2 instance and some associated pieces of software (shown below) correctly. This script will create a file called output.txt on your remote EC2 instance. You will then transfer that file back to your main computer and upload it to the autograder.
Obtain your output.txt file by running the following commands in your EC2 Instance. Note that you may have to answer "Yes" when asked if you want to install the software packages.
$ cd ~
$ sudo apt-get update
$ sudo apt install binutils
$ sudo apt install python3-pip
$ sudo apt install gcc
$ sudo apt install unzip
$ sudo apt install zip
$ sudo apt install openjdk-11-jdk
$ sudo apt install maven


$ wget http://eecs481.org/hw0/hw0check.py
$ python3 hw0check.py
If you ran this correcly, it should produce the folloing output:
✓ linux verified successfully!
✓ gcc verified successfully!
✓ pip verified successfully!
✓ unzip verified successfully!
✓ zip verified successfully!
✓ java verified successfully!
✓ maven verified successfully!
We generated a file called 'output.txt' here are your remote EC2 instance (not on your local machine).
Please transfer and submit 'output.txt' to the HW0 Autograder for partial credit.
Hint: typing the command 'ls' will show this file in you current directory of your EC2 machine.
You may see the error message "We can't verify the version of [name of package] installed. Here is what was expected vs. what we received." This usually means the correct package was not installed or that the version doesn't match. You should double-check that you installed the right package. The good news is that we are providing you with the Python script that performs these checks. If you're confused, you can open the script (hw0check.py) to see exactly what is being checked and compared! Learning to read and understand test scripts is another important skill you’ll practice in this course.
If you receive an error such as "failed: Temporary failure in name resolution. wget: unable to resolve host address 'web.eecs.umich.edu'" on your VM, make sure your guest is connected to the Internet by switching it to bridged mode.
After invoking python3 hw0check.py correctly, you will find a file output.txt in your home directory. Upload that file to the autograder for partial credit!
(2) Obtaining second.txt
To obtain second.txt, you will need to:
- Make an initial submission to the autograder with your output.txt.
- After passing the first test on the autograder, review the autograder's output. It will display two special hidden words that only appear if your output.txt is correct.
- If the autograder output looks like a bunch of symbol characters or gibberish, try using a different browser. Multiple students report that Safari does not work for seeing the autograder output, for example. Finding the hidden words does not require any decoding: each one is on its own line with no distractors.
- Create a text file second.txt and write the two hidden words into it, exactly as shown. Note that you need to submit a plain text file (not an RTF or DOC or PDF file).
The purpose of second.txt is to help you get used to carefully reading autograder output, a critical skill for future assignments. Your first submission may not receive a perfect score (without second.txt), but that’s expected. You can submit multiple times per day, so feel free to iterate.
What do these commands do?
The file hw0check.py is a program that detects which version of Ubuntu you are running and versions other packages you have installed. You should have an identical environment with Ubuntu 24.04, gcc, python3, and so on. Thus, the output.txt will (mostly) only been correct if invoked on the environment expected by the autograder for the subsequent assignments. If you get partial or full credit for HW0, then you at least have some confidence that you can eventually get the rest of the assignments working as well!
Note well: If you run hw0check.py on another environment besides the Ubuntu 24.04 environment described in this spec, then no guarantees are made about the correctness of the file (or whether you can run the program at all). Only run this in your EC2 setup.
How do I get output.txt out of the cloud?
Note that since you're working inside a cloud computing setup, you'll occasionally need to move files to and from your cloud computing setup and your local machine. In this case, you have downloaded a program (hw0check.py) using the wget utility. This makes a file in your cloud computing environment. When you run that program, it creates a new output.txt file in the cloud computing environment as well. But how do you get that file to the autograder?
You can use the scp (Secure Copy) utility from your local machine to download files from your EC2 instance.
On your host (local, real, desktop/laptop) computer in a terminal, you can download a file from your EC2 instance:
scp -i /path/to/your/eecs481.pem ubuntu@put_your_EC2_hostname_here:/path/to/some/remote/output.txt /path/to/where/you/want/to/download/it/output.txt
The command above downloads output.txt.
In addition, on your host computer in a terminal, you can upload a file to your EC2 instance from your host computer:
scp -i /path/to/your/eecs481.pem /path/to/local/file/to/upload.txt ubuntu@put_your_EC2_hostname_here:/path/to/some/remote/target.txt
The command above will upload upload.txt from your local computer but name to target.txt on the EC2 instance. (If you don't want to rename it when transferring it, use the same name both times!)
For some later homeworks, the -r option for scp may be helpful: it recursively transfers entire directories.
How do I transfer many files at once with scp
Quick answer: scp -r (but keep the -i key.pem)
Long answer: If you're not familiar with utilities like these, we definitely encourage you to watch the video above and practice Googling usage patterns for and hints for less-familiar tools. There will be multiple instances later in the course where similar questions come up and you will definitely be in a better position to help yourself if you cultivate a habit of looking in multiple sources for such information. Good luck!
Final Remarks
There is a fair bit of systems programming in this course. We will use a mixture of command line tools, multiple languages, and other large projects that you may not have seen, written, or used before. That's the point. In software engineering, much of your day-to-day work will involve reading code and documentation, as well as getting things set up to run. We are big believers that this type of experience is some of the most valuable you can acquire as an undergraduate student — it makes you more productive at other tasks.
This assignment is not meant to take more than 2 hours (excluding the time taken for the Amazon AWS signup). Please use this assignment as a gauge for your technical preparedness in this course. A big component of the assignments is "read the docs, figure out how to invoke the tools." We acknowledge this is not for everyone — indeed, one purpose of having this (and HW1) due so early is to help you decide whether you like this style of assignment. Please contact us on Piazza if you have any questions!
FAQ and Troubleshooting
In this section we detail previous student issues and resolutions:
-
Question: When I follow the instructions above, I get Java 21.0.8 instead of the required version.
Answer #1: Re-starting the process from scratch (terminating your instance, making a new one, etc.) should resolve this.
Answer #2: If all else fails, you can try these three steps:
-
sudo apt install openjdk-11-jdk openjdk-11-jre -
sudo update-alternatives --config java(select 11.0.28) -
sudo update-alternatives --config javac(select 11.0.28)
-
-
Question: I have followed the instructions above but t3.micro does not show as being part of the Free Tier. It only shows t2.micro as being part of the Free Tier. What do I do?
Answer #1: You are likley using an AWS account that is >6 months old. Several students found that if they made a new AWS account (usually by making a new email) it showed t3.mirco as part of the Free Tier.
Answer #2: Some students report that even if they make a new account, the fact that they use the same credit or debit card makes it so that they can't get a Free Tier, if you are able to, we reccommend using a new card. If that is not possible, some students have found success by purshing a VISA gift card from local grocery stores.
Answer #3: If all else fails, t2.micro is just as fine as t3.micro. The only difference is speed. You will likley run HWs at a slower speed than others but it will not prevent you from completing the assignments.